Setting Up A Temporary Studio

At the end of April I moved from Calgary to Oliver, BC. This is a temporary setup while I work on a more permanent place nearby. As such, I needed to avoid making any holes in the walls which presented some challenges. I decided it would be easiest and most cost effective to bring the treatment from by previous room across the 9 hour drive rather than try to sell that off and then build from scratch.

I managed to get roughly a week of down time to get up and running with Atmos. It took around 4 days to get set up for stereo and then another 3 days or so to get Atmos going. Some changes and additional treatment were added over the next week or so but at that point I was all ready to get back to work.

In addition to moving and getting set up, I took this opportunity to work on a long list of changes I needed to make in my system which included the move from 7.1.4 to 9.1.4 (eventually 9.1.6 in my next space). The DSP platform I originally invested in unfortunately had a number of problems and the manufacturer of those custom boards wasn’t willing to acknowledge the problems or help me fix them. This resulted in me needing to replace those boards with miniDSP Flex units. The boards were built into the speakers so every speaker needed to be opened up, modified, and then recalibrated with an external miniDSP unit. I also made the move to my new surround speakers which I needed to build all of the amps for. Rather than build these into the speakers I decided to have these externally housed. In addition to essentially rebuilding all of the speakers, I also had to build new cables to connect to the miniDSP units. Lots to get done in 3 days (plus calibrating the system)! If anyone is interested I could write another blog post describing the gear I’m using in my system and how it’s all wired up.

I was fortunate to have the dimensions of this room before moving so I could plan things out and hit the ground running. Knowing that I’d inevitably run into problems while scrambling to get set up, I spent months planning out everything to be done so that I’d need to do as little thinking as possible during the week I had to get set up.

Being wider and with a slightly higher ceiling, in many ways this room was a step up from my previous room. Having the chance to start from scratch also allowed me to make changes to the treatment approach which I didn’t bother with in the previous room knowing I’d be leaving in the near future. The biggest downside to this room is the lack of isolation. Both to the rest of the house and to the outside. Unfortunately I won’t be able to do any kind of recording in this room. It’s somewhat of an advantage in that low end is more easily able to escape and not cause as many problems as when you’re in an underground bunker. Leakage outside from my room is minimal but I try to avoid working at night when it could be noticeable. Neighbors mowing the lawn and cars driving by can be quite annoying.

My first step was to create a model in SketchUp and prepare a plan of attack. In order to not put holes in the walls I decided to frame a structure which allowed me to both have the speakers and clouds overhead and hang the panels at the sides.

The first step was to figure out the largest listening triangle I could set up with the speakers being against the front wall and not too close to the corners. This ended up being a slightly smaller triangle than in my previous room but still close to a 2m listening distance.


Starting at the front of the room I put my 4 large DA10 panels across the corners. In the framed structure (not shown in the model) I used my DA3 panels. I stacked these to effectively create a DA6 with an additional diaphragm in the middle of the panel. There are 3 of these on each side. These were all hung from the top of the structure using some heavy duty zip ties.


On the ceiling I placed 8 DA3 panels down the middle in the 4 cavities of the structure with each having a stack of 2 in them. Rather than using zip ties I screwed on an additional 1x4 below them which the clouds rest on. The mounts for the height speakers attached to the 4 pieces which are perpendicular to everything else on the ceiling structure. In addition I added my 4 Newt panels (150 - 300Hz focused absorbers developed by Ken Goerres) on the ceiling towards the outside.


At the back I placed a DA10 and DA12 (on top of a storage cabinet). These sit out in the room directly behind the couch. All of the DA10 and DA12s use an experimental diaphragm material which seems to extend their performance down to 30Hz. I have limited experience with this material and it’s somewhat expensive so I’m not yet prescribing it in designs. Hopefully I can do more testing in the near future.


Aside from some additional treatment which I’ll discuss below, the biggest weakness in this setup is the back wall. In order to really tame that I’d need a substantial amount of treatment which I’m not planning to build for this temporary setup. The results far exceeded my expectations so I’m happy to live with a slightly less than ideal situation with the back wall. The DA10 and DA12 there are surprisingly effective even though their surface area is very small compared to the surface area of the back wall.


Originally I was planning to set up a sub in the room and take measurements as I built out the room but I didn’t have time to do so and the room was quite a mess while building it out so the measurements wouldn’t really be useful. I’d need to move everything out of the room and slowly bring it back in which I didn’t have time for.


On to some pictures…


Lots to pack

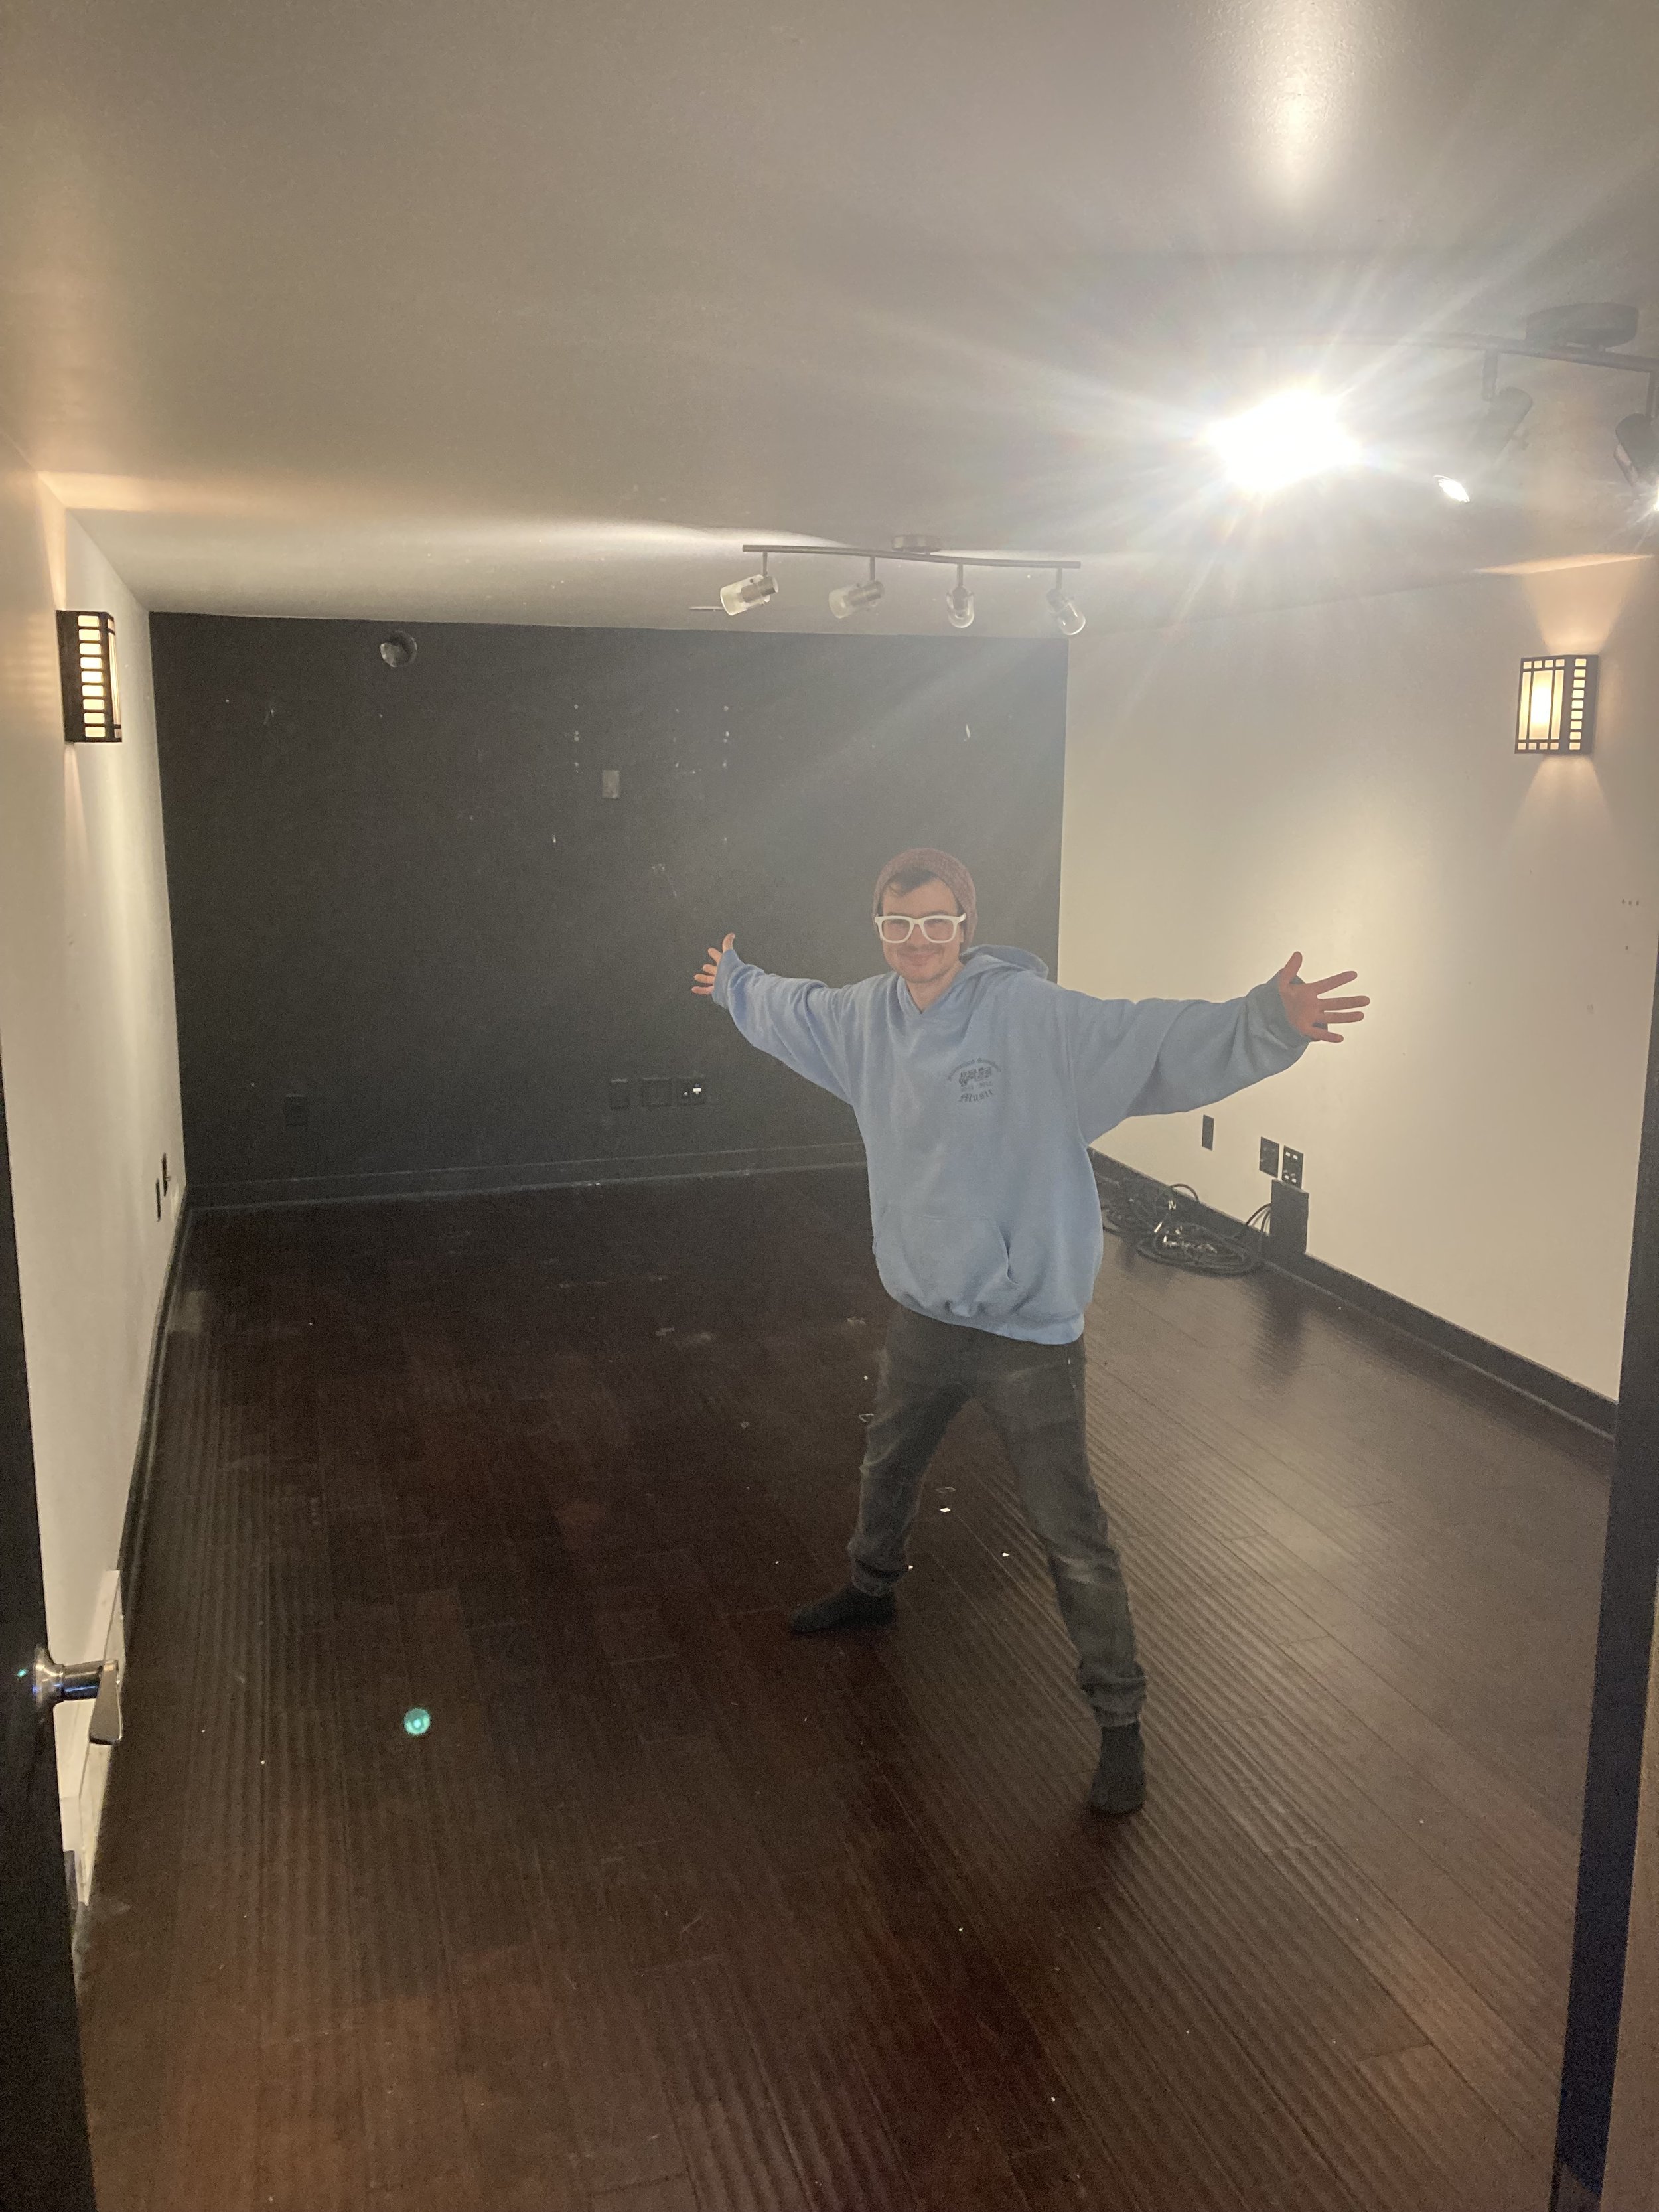
Eren showing off the empty room

Making the beautiful drive across the Rockies
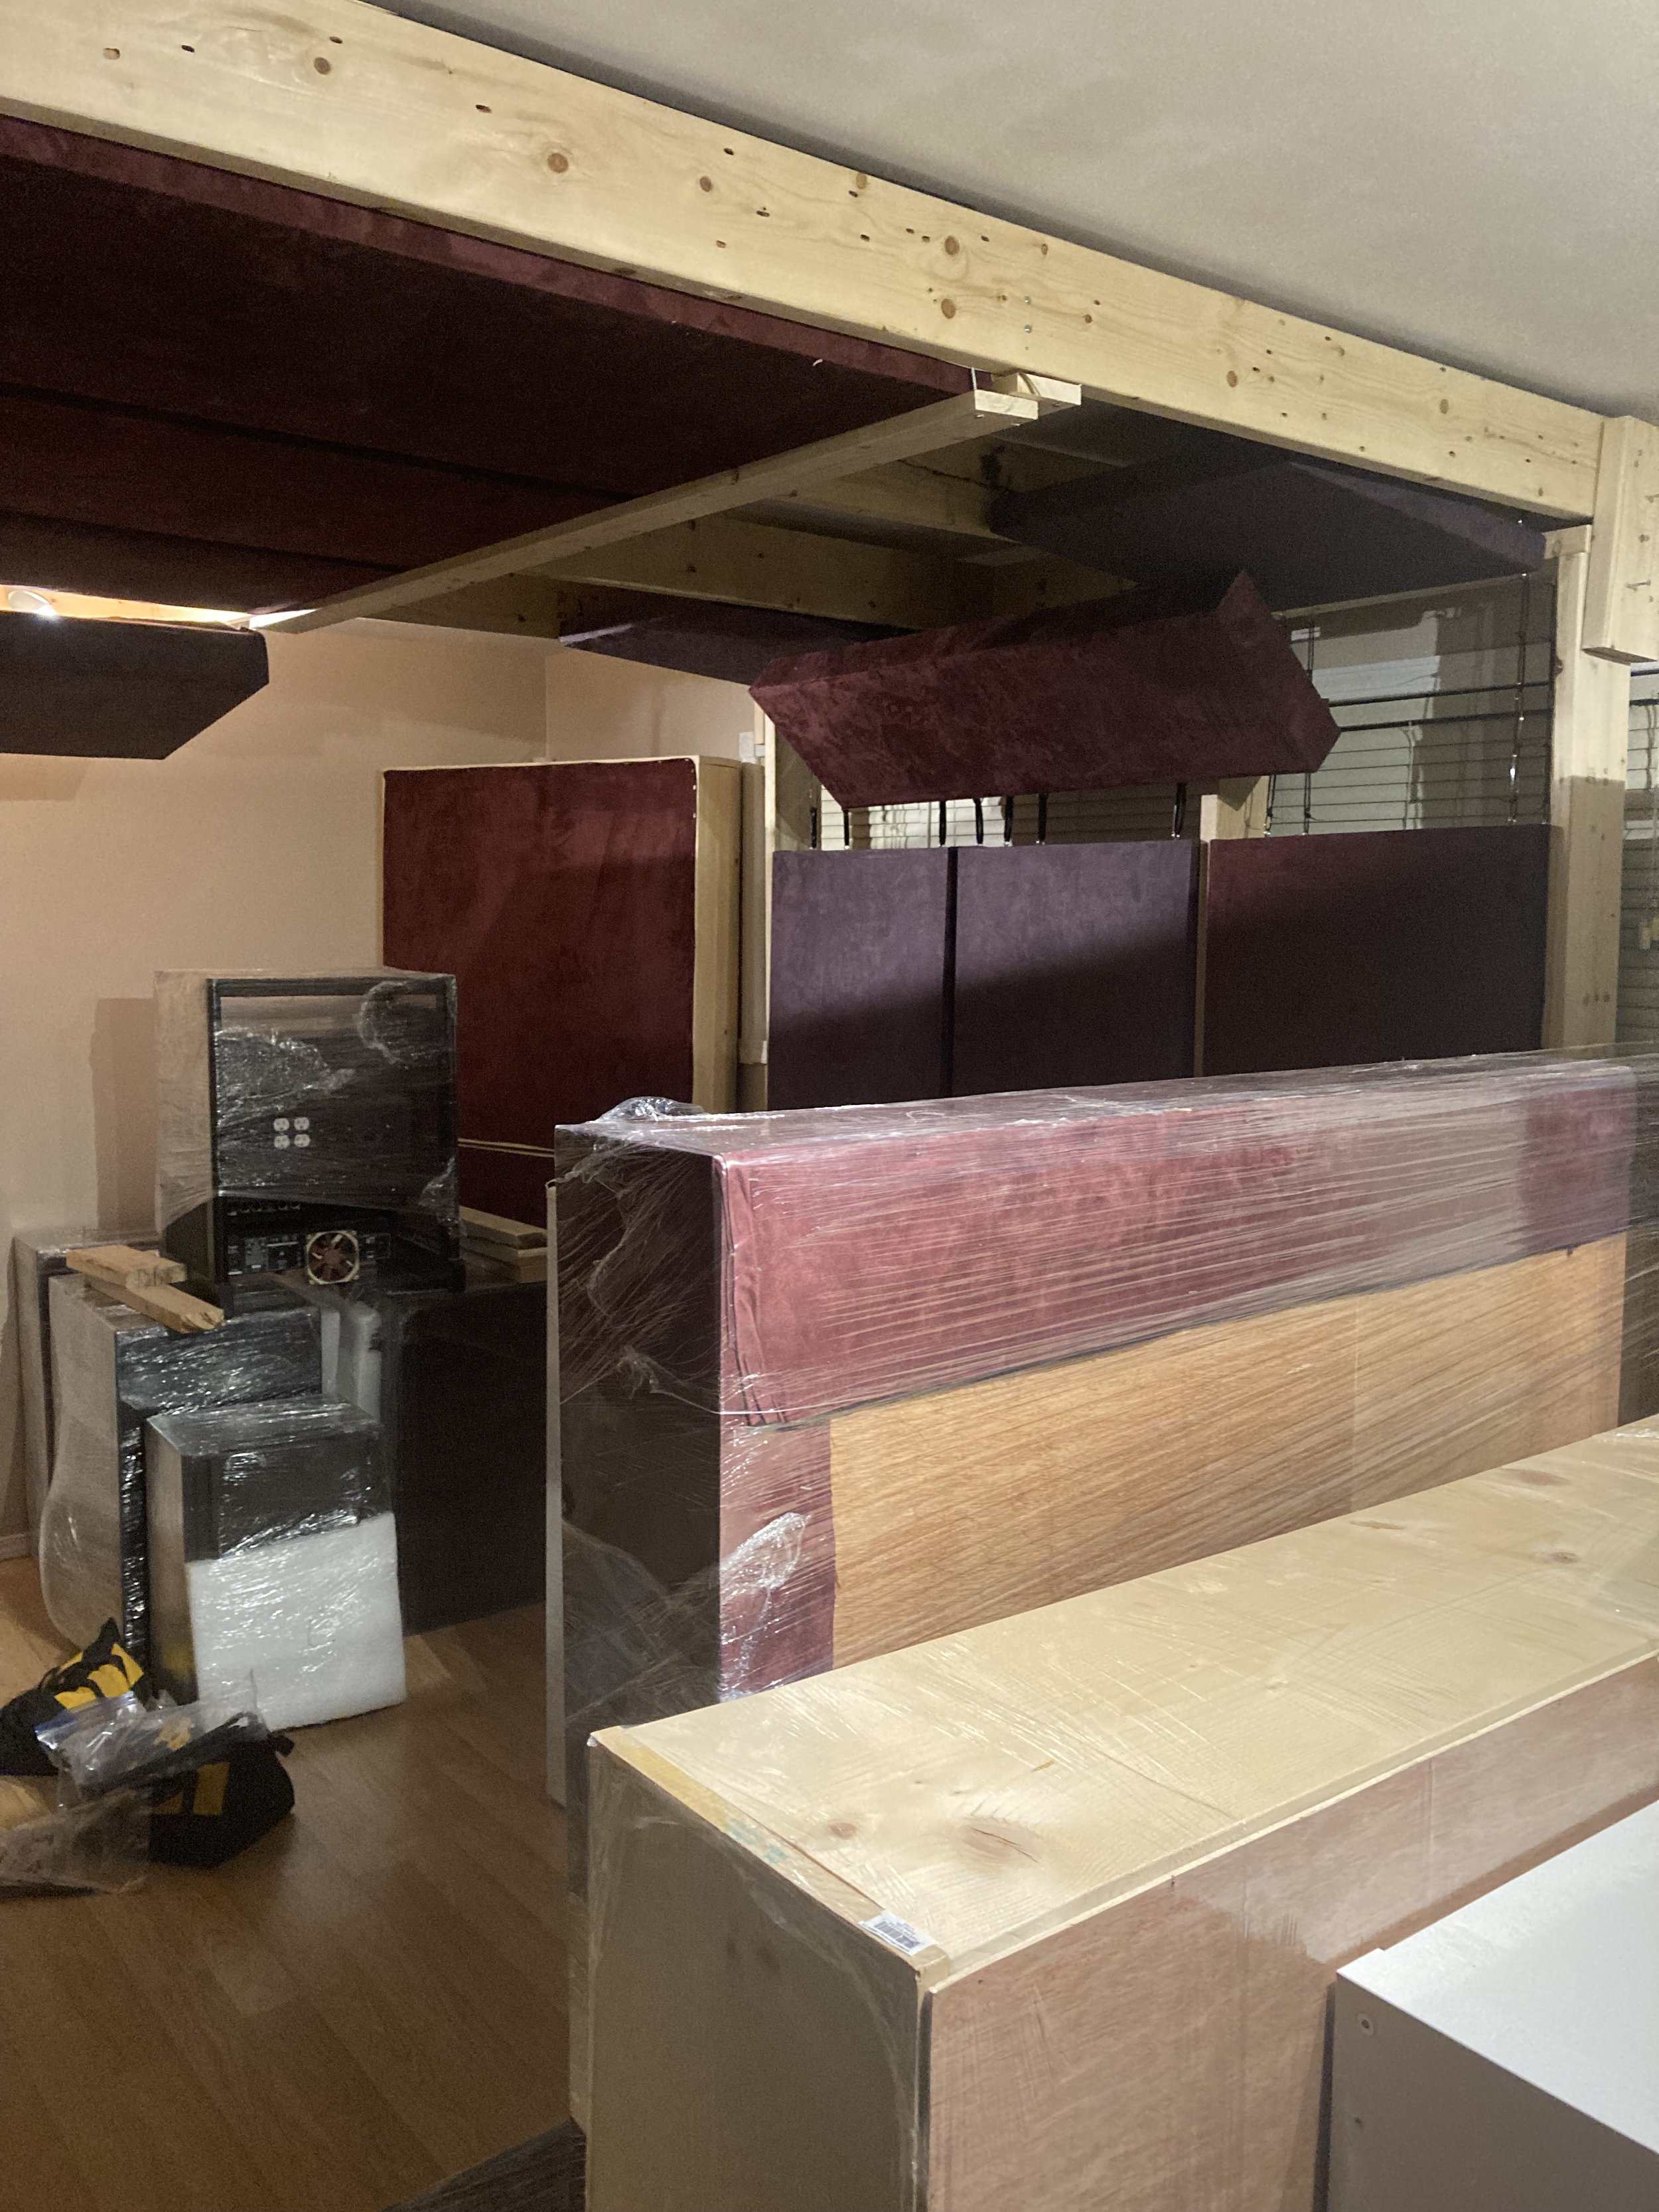
Truck unloaded

Structure getting built

I built the 2 walls and ceiling sections separately. To get it all together I had 2 people lift up the ceiling section while 2 people carried in each side. Then it was all screwed together at the ends. It’s not the sturdiest structure but it works. The walls sit on rubber feet to not damage the floor. There’s a 1” gap to the side walls and ceiling.

Front corners and clouds up

Speakers starting to go up

Modifying the electronics for the main speakers

Lots of cables

Slowly getting there and surrounds starting to go up

More speakers to modify

More speakers getting set up. Thankfully had Eren to help although I’ve hung speakers and clouds up on my own far too many times

At this point I had everything set up and was getting back to work. Unfortunately there were some things in the imaging that were bothering me along with some not so great dips in the low end. There were a few areas without treatment which this could be attributed to - ceiling directly above the speakers, reflection point on the ceiling towards the side (panels were only covering the center area), a small bit of exposed wall at the sides above the wide speakers, the front wall, and reflections from the L/R speakers off of the center speaker which was now sitting a little farther forward than in my previous room.


Over the next few weeks I added some more treatment which fixed these issues. Most notably was the area directly above the speakers. I built a “bridge” that rests on top of the front corner panels. On top of this is 9” of rockwool spanning the entire width of the room. In order to not spend a fortune on fabric I just wrapped these new panels in burlap. This front section made a massive improvement to the dips I had.


Next up I added just 3” of rockwool bridging the reflection points on the ceiling between the new bridge and the main framed structure. This along with the bridge solved most of the imaging issues I was having. Some additional rockwool was stuffed above the wide speakers but this had a negligible effect.


To deal with the reflections off of the center speaker I came up with some elaborate ideas to strap some treatment onto it but ultimately I just glued on some thick felt. I was shocked by the difference this made. My speakers are already more directional than most but even then, it made a huge difference to the imaging and cleared up some harshness I was hearing. Just goes to show that even what may not seem like it’s directly in the firing path of the speakers matters.

“Bridge” holding up 9” rockwool bales

0.5” felt added to speakers

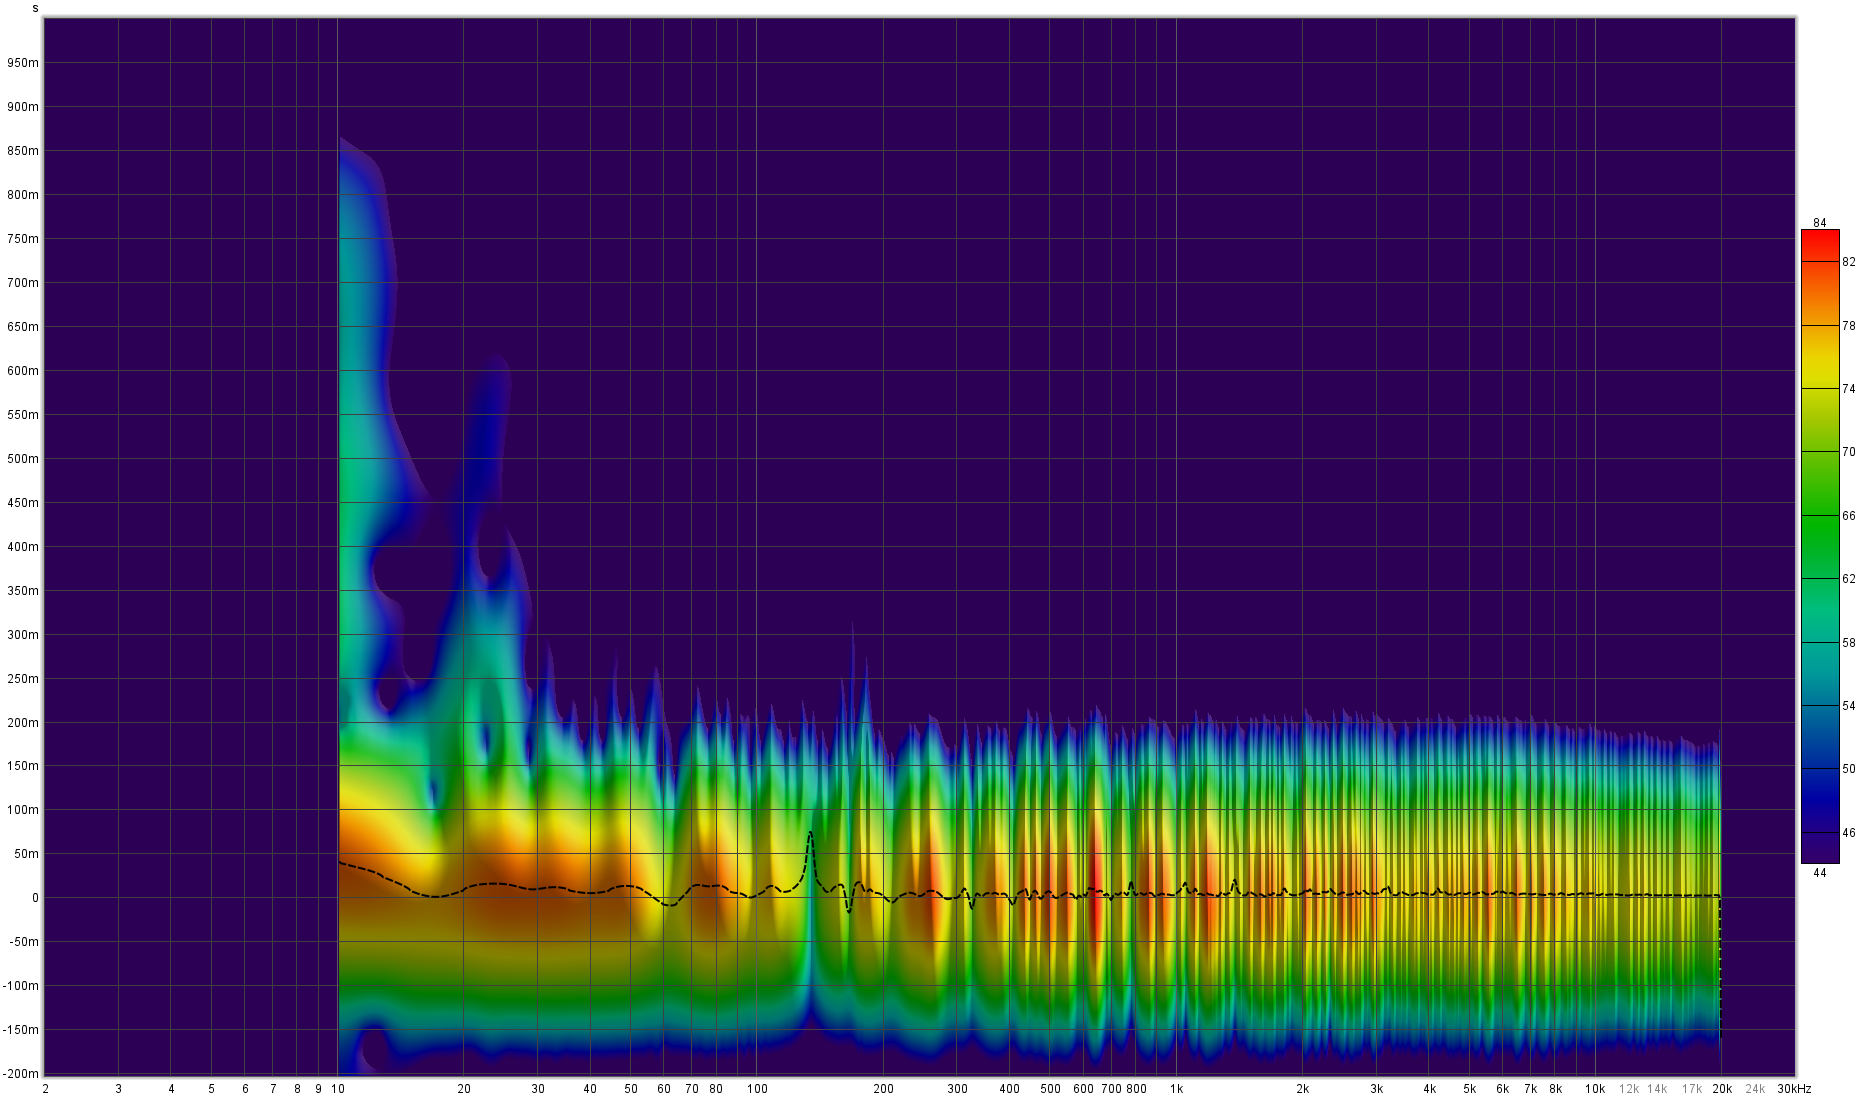
Spectrogram of left speaker - things in pretty good control with output flat down to below 10Hz. Only small problems left are dips at around 60Hz and 140Hz which are a function of the back wall and floor. Not bad for a temporary setup


With these additional changes and treatment I didn’t feel any need to put treatment on the front wall. Things were sound great at this point. While most of the Atmos surrounds have quite a bit of room EQ on them, my left and right needed essentially no room EQ. I say essentially because they have EQ in them for the speakers themselves which I adjusted in this room (mainly a shelf on the bottom to extend the sealed subs) but I wasn’t compensating for anything in the room. The center speaker in particular doesn’t have a very pretty response since it’s in the center of the room both left-to-right and ceiling-floor.

Current state of things

Not a bad view. Summers hotter than LA won’t be fun though…


Some Recent Work in Speaker Development

I thought I’d start off this year with a bit of a recap of my work developing speakers since this past summer. This will by no means be an exhaustive account. I’ll be sharing some more on Instagram over the coming months but most likely won’t get in depth on there. Some pictures from my messy little testing room can be found at the bottom of this post.

I should start off by saying I have no intentions of being a speaker manufacturer. Perhaps that’ll change in the future but selling speakers at any significant scale is an undertaking I’m not capable of pursuing on my own. I’ve been fortunate to have the opportunity to be involved with a few companies like Audio Test Kitchen doing some R&D involving speakers and putting my knowledge to good use but I do this primarily for my own uses. I know I’ve said this before - unfortunately pretty much all products on the market are compromised in some way (which is a necessity for selling pretty much any product) so if you want the best you very likely need to develop your own tools.

As I’ve posted a bit about, I’m currently in the process of designing a new studio. This will require new speakers which fueled my most recent research in the field of speakers. I had already decided that my system will use a pair of TD15H subs on each side so I was concerned with things only above 100 Hz. What I thought would be a fairly straightforward set of tests turned into an incredible number of revelations and personal discoveries.

My goal was to test the best of a number of different types of drivers and configurations. While there are a number of things I haven’t tested and hope to eventually do, some of the drivers I tested included small mid woofers, larger mid woofers, ribbons, AMTs, mid domes, ring radiators, silk tweeters, beryllium tweeters, textreme compression drivers, and beryllium compression drivers.

Because I was working with some of the best possible drivers, I knew certain factors like distortion would be pretty irrelevant. It’s all well beyond acceptable levels. Every driver has a certain region it excels at. I was hoping IMD tests would help me find “winners” based on technical parameters but again there weren’t really any objective winners.

My testing consisted of flattening the response of a driver and then A/Bing with another driver. Frequency responses would be limited to either the range I would potentially use them in or limited to the capabilities of a certain drivers I’m comparing against. In some cases I set up crossovers to compare combinations of drivers.

While things were measuring very similarly, I was shocked to find the differences present. No matter how hard I’ve tried I haven’t found any way to measure these aspects I’m hearing (something I’ll subsequently be putting much effort into). In the notes I make after every test I’ve come up with my own language to describe these parameters. This includes openness, thickness, liveliness, lightness, the shape of a sound, the focus “inside” a speaker, snappiness, “size” of the source, smoothed transients, and flatness of projection.

Speaker design is all about tradeoffs. I’ve said this countless times and will continue to repeat it. What I wasn’t prepared for was the intricate level to which this extends. For example, comparing a Be compression driver in a very large waveguide to a Be tweeter + 4” mid woofer. Both systems covering 600 Hz to 20 kHz with exactly the same frequency response. The Be tweeter has a uniquely crisp and clean top end with a snappy quality which the large waveguide lacks with more smoothed out transients. At the same time, the waveguide has a spatial cohesion unlike anything else. Even an excellent tweeter crossed low to a 4” woofer introduces some spatial blurring and you lose the point source quality. Another example is how a waveguide or horn entirely changes the shape of how the sound is projected. Don’t get me started on open baffle speakers…

Unfortunately I found it impossible to come up with the ultimate solution for my new speakers. Even with the use case entirely defined (listening distance, SPL requirements, room acoustics, etc.) there was no way to have a single design which optimized the tradeoffs. I’ve come up with 5 entirely different systems. One system will be flush mounted with the subs while the others will be standalone units I can bring into the room and then integrate with the subs.

What’s interesting is how close the systems I came up with resemble certain speakers on the market. I ended up following the same paths that many speaker designers went down to come up with their designs. I’d say they’re all far from perfect but they’re all excellent in some regard the designer has based their design philosophies around. These designers and speakers include the Kyron Gaia, Vivid Audio, D&D 8C, GR Research, Spatial Audio Labs, Javad Shadzi, Gedlee, Knif, Joseph Crowe Audio, OMA, Gryphon, PS Audio, Grimm, and my friend Paul Linke.

At this point the majority of my 5 designs are either “theoretical” in that I haven’t yet tested the full system or they still need to be designed in a final form. I’m done with testing for now and will start things back up hopefully next summer. Until then I’ll be focusing on the CAD work for these final designs.

P.S. While I often seemingly criticize speakers on the market, I’d like to clarify that I have nothing against most companies. Yes, some speakers are absurdly expensive and I’m not a fan of pricing based solely on bigger = we can charge more. Having said that, running a profitable business is by no means easy or cheap. R&D, manufacturing cabinets, assembling speakers, packaging, shipping, storage, distributer markups, marketing, providing warranty and support, accountants, lawyers, it all adds up. My goal is simply to share what goes into speakers and what you’re really getting when you buy, say, ATCs. DIYing is a fraction of the price (or in other words you can get vastly better speakers for the same price) but that doesn’t mean what’s on the market is a rip off. My biggest criticism would be that speakers on the market need to work for everyone. It’s practically never designed for a single use case. If you want the best possible system (whether it be off the shelf or DIY) it needs to be designed for your specific use case otherwise you’re getting needless tradeoffs and sacrifices.

The P Word

The dark magic that crops up everywhere, is the root of all evil, and no one seems to understand (including me…) - phase finds its way into everything I do.

What is phase? In a nutshell, it represents delay. If you delay a signal, technically that’s phase shift. Things get interesting when different frequencies have differing amount of phase shift. Most people working with audio know it as the thing which makes your mics sound funny. If you sum mics with differing amounts of delay (such as when they’re a different distances to a source) then that causes certain frequencies to get boosted and others attenuated. Unfortunately people have the habit of referring to polarity as phase. Flipping polarity is different from a 180 degree phase shift (which implies a shift in time).

Where else does phase manifest? It’s hard to find anywhere it doesn’t. Most roads in the projects I work on lead to phase. When you look at a typical speaker (ignoring coax designs), you have multiple sources of sound (multiple drivers) which overlap in their frequency ranges. What happens when you move around a speaker? The relationship of distances between each driver and you changes. This results in the signal from one driver arriving at your ear at a slightly different time than the other (speed of sound is roughly 344m/s, you can do the math…). What’s the result? Phase shift! This change in timing is a major factor determining the directivity (off axis response) of a speaker which ultimately determines how it’ll interact with a room (on axis might be fine but the reflections you’re hearing off of that bare wall in your room could be riddled with problems cause by phase…). Speaking of reflections in your room - phase!

Another major factor relating to speakers and phase is the crossover filters which determines which frequencies go to which drivers. These filters introduce their own phase shift. Not only does it affect the off axis response, but this time it also affects the on axis response. It baffles me how so many people claim that phase shift is inaudible. Unfortunately this conclusion was arrived at through flawed testing. In a steady state signal (like a square wave), the relative timing of harmonics doesn’t matter much. What does matter is the timing of transients. If half of a snare’s sound is delay from the other half, it’s not difficult to see how this would lead to very audible effects. Much of my work with speaker design has revolved around exploring these effects of phase shift. With nothing but a simple filter the soundstage of a system can be changed quite drastically.

Phase once again pops up when it comes to my work exploring room acoustics and horns. In one way or another, it’s responsible for a significant part of what we hear. Room modes, reflections, and the flare rate of a horn are all largely driven by phase. You can’t escape it.

Lastly, and most importantly, it allows me to do what I do with mastering. Playing with phase is how I’m able to craft a song and bring out a certain element or potentially help fight a problem. Tools like EQ, M/S processing, and width tools allow me to sculpt the soundstage and depth with nothing but phase. Remarkable yet an endless source of curiosity.

How to Flex Your Speakers on the Internet (An Intro to Speaker Excursion)

I’ve seen a number of posts and comments in various mixing and mastering groups relating to speaker excursion which perpetuate misinformation so hopefully this post helps to educate engineers on this matter. This is not at all an in-depth look at excursion, speaker design, or the various pro and cons associated with it. This is an area I’m actively researching and am certainly no expert on.

Excursion is all about how much a woofer (or any speaker driver really) is moving. A woofer produces sound by moving the cone back and forth. The range of that motion is the excursion (usually measured in mm). Peak-to-peak is the convention used as opposed to one-way travel. The Xmax of a woofer is the maximum linear excursion which represents how far the cone can move without leaving the magnetic gap. I won’t get into details about this but the important thing to note is that beyond Xmax the distortion rises very quickly. Drivers should ideally always stay within Xmax. Xlim (sometimes referred to as Xmech) defines the mechanical limit which the cone can move. If you try going beyond this point you will likely damage the driver.

The point that I’d like to get across in this post is that excursion is not an absolute value to be used when comparing systems. Excursion is very closely tied to a driver’s sensitivity. The sensitivity defines how much power you get when you put in a given amount of power. A higher sensitivity driver will produce more sound with the same amount of power from an amplifier. It may seem strange that drivers can have different sensitivities but a woofer is a complex electrical and mechanical (and acoustic) system with a number of different parameters which are all tied. As with speaker design in general, woofers are all about tradeoffs. Some of the parameters which affect sensitivity are the weight of the cone, compliance of the system, shape of the cone (how much air is “held” in front of the woofer by the conical shape), the way the voice coil is wound, and the strength of the motor.

Some of the tradeoffs which the sensitivity of a woofer can affect are the frequency range that the woofer extends through, the size of the woofer, the size of the cabinet for the woofer, and lastly, the excursion. A higher sensitivity driver will require less excursion to produce the same SPL as a lower sensitivity driver. In general a higher sensitivity driver will be capable of higher max SPL levels than a lower sensitivity driver (of course there are many other factors to consider such as the Xmax and power handling).

Why does this matter? I’d like to mention two situations which I feel should have been handled differently. The first was a comment made on a clip of D&D 8C's showing their subwoofers moving with pretty high excursion. The commenter mentioned that one should never be working at those levels and that the levels they work at produce next to no excursion on their speakers. What does a clip of a sub with high excursion tell you about the playback levels? Next to nothing. Were they listening at levels which would cause hearing damage? I have absolutely no idea. I wasn’t in the room. The speakers could’ve been producing next to no sound.

The woofers on the 8C are fairly low sensitivity and reasonably high Xmax woofers. They’re made to move. They’re small woofers in an extremely small cabinet and the system is EQed to deliver deep bass (could easily be +10dB at 20Hz). What does that mean about the sensitivity of those subs (factoring in the corrective EQ)? They’re very low sensitivity and as a result will take a lot of excursion to produce high SPL levels in the low end. If I put them next to my 15” subs and played them at the same levels, the 8C’s could easily hit Xmax and you wouldn’t even be able to see my subs move. There are certain conclusions that can be drawn about the resulting sound quality but I won’t get into that here.

The second situation I’d like to mention is someone who posted a clip of their brand new speakers playing something with high levels of excursion and implying that this made the speakers awesome. These were a small Scan-Speak midrange woofer which I’m familiar with. They’re designed to have fairly high sensitivity and low Xmax. While many speakers can produce high excursion (like the subs on the 8C’s), these woofers are not designed to move much. I’m sure they were close to pushing the woofers to the point of damage. I don’t believe that was intentional but just a result of not knowing that different woofers have different Xmax values. Just because you can make one woofer move with 90mm of excursion doesn’t mean any woofer can handle that. The woofer in question has an Xmech of 9mm.

To add to the problem, these particular speakers were ported without a subsonic filter (which I know as they’re passive). A ported speaker will stop loading (supporting) the woofer below a certain frequency at which point the woofer is essentially moving uncontrollably (as if the woofer were in free air). This produces high excursion without making any sound. At the same time it distorts higher frequencies thanks for doppler distortion. I’m sure a lot of the excursion in this clip mentioned was producing no sound. It was not at all a reflection of the high quality nature of this particular speaker. Just reckless woofer abuse.

To summarize, if you see a clip of a speaker producing high levels of excursion, that tells you very little about the system. You can’t draw any conclusions about how loud it was playing in the clip, the quality of the speaker, or how low it goes without more information about the system. If anything, it’s a poor indication since the higher the excursion, the more potential for distortion that will be introduced. If you don’t know how much Xmax your woofers can handle, you should be very careful and listen closely for any signs of distortion. If you hear any distortion from your speakers, back the level off. Ideally (at normal playback levels) there should be as little excursion as possible but that’s a topic for another post once I’ve had a chance to further educate myself on the matter.

RCF Ayra Pro 5 Speaker Review (and Why Phase Matters)

While I have no intention of posting product reviews on this blog, when the Ayra Pro 5 monitors came across my radar, I had to get my hands on a pair and would like to share some of my findings for the sake of the educational value. The majority of this review will be a comparison with the JBL LSR305 as they are in a similar price range (and I own a pair of the LSR305). The JBL are well regarded for their price and I feel are representative of a speaker that has no major flaws. They aren’t offensive as many speakers are.


Why would I order these fairly obscure speakers which you rarely see in North America (I had to order from Germany)? It all comes down to their use of FIR filtering for phase correction. This is something I’ve been researching for many months now and is only found in speakers costing at least 5x as much. I was very surprised to find a $150 speaker offering this. This is the same technology that you find in systems from DEQX, Trinnov, and Dirac which I’ve discussed in other posts.


What is phase and why does it matter? The simplest explanation as it relates to speakers is that the phase response indicates the timing relationship of the frequencies being played out of the speaker. Excess phase refers to the component of the phase response that isn’t related to the frequency response. Ideally there should be no excess phase in a speaker. This would mean that all frequencies are projected from the speakers at the same time (not factoring in minimum phase shift caused by deviations from the frequency response). In actuality, most speakers have high levels of excess phase so a lower frequency may be significantly delayed compared to a higher frequency.


There have been numerous studies “proving” that phase shift isn’t audible but there is so much confusion in the terminology used to describe phase shift that I have yet to find any studies which accurately tested the audibility of phase shift. I’ve set up filtering to correct the excess phase response of many different speakers in different studios and there’s never been any doubt about whether the effects are audible. Correcting the excess phase response leads to an increase in detail and clarity. This makes perfect sense considering that without the correction, the sound you’re hearing is smeared in time.


Because it’s winter, I’m not able to measure speakers outside so the measurements shown below are limited in showcasing the anechoic behavior of the speakers but I think they’re more than adequate for showing how the Ayra compare to the JBL. Starting with frequency response, it can be seen that the JBL extend lower while the RCF have a more pronounced midrange in the 600Hz area and the top end is about 3dB hotter than the JBL. These measurement were taken in a small untreated room and are not windowed so the overall response is not at all indicative of the response in better acoustic conditions.

RCF in red, JBL in orange

The following graphs show the excess phase response in gray for the RCF and JBL. The reduced phase shift in the RCF can be clearly seen. These measurements are windowed and so represent the anechoic response of the speakers. The only thing that should be disregarded are the dips below 1kHz which are a result of the windowing.

RCF excess phase response

JBL excess phase response

Below are the distortion measurements for the two speakers. Second harmonic is in red and third harmonic is in orange. Aside from in the 1kHz - 2kHz range, the RCF generally shows lower levels of distortion. These measurements are 85dBSPL at 1m.

RCF distortion

JBL Distortion

Lastly are the impulse and step responses. The effects of the phase correction can be clearly seen here. Both speakers have a 5” nominal woofer (the RCF is around 0.5” smaller than the JBL) and a silk tweeter in a waveguide of similar proportions so I feel that this should be a fair test.

There’s no doubt that the RCF has a tighter step response. The JBL is a mess in comparison.

RCF impulse response

JBL impulse response

RCF step response

JBL step response

So how do they sound? Well each speaker has its pros and cons. There’s no doubt that the imaging and detail is better on the RCF. The JBL is fuzzy in comparison. Unfortunately the RCF has some unpleasant qualities which can be seen in the frequency response. The peak in the midrange is somewhat annoying but the biggest problem by far is the top end. While the JBL has a nice downward tilt towards the top (ignoring the bump at 16kHz), the RCF dips down at 1.7kHz but then comes back up with a vengeance and is ruler flat up to 20lHz. I’m a believer that a ruler flat response is not ideal and overly bright. The nature of being an inexpensive tweeter (in both the JBL and RCF) makes this even worse.


While the JBL are inoffensive, the top end on the RCF is unfortunately offensive and a bad case of tweeteritis. If I had to pick between the two I would go with the JBL despite the unquestionably better resolution of the RCF. With some additional EQ I think the RCF would beat out the JBL but that’s beyond the scope of this review. For anyone interested in hearing the benefits of phase correction, the RCF are a great way to experience it as long as you keep in mind they have other problems of their own. If you have the ability to EQ in your rig, I think the Ayra series could be an incredible value.


It’s worth noting that the RCF have a very impressive build quality. The plastic baffle on the JBL make them feel much cheaper and can often start buzzing. Everything on the RCF is much more solid and very impressive for a $150 speaker. For anyone interested, the DSP in the RCF is based around an ADAU1701 chip.


Mixing in Surround

With the proliferation of surround thanks to Apple’s Spatial Audio, many engineers are having to start working in surround. It’s certainly not an easy thing to do and the majority of the content being released reflects the inexperience that most engineers have in this area. Mixing in surround requires a learning curve that has been well established thanks to the film industry and research done in this field for many decades. Of course there’s no “proper” way to do it but there are many things which can poorly affect most listeners’ experience. In this post I’ll try to outline a few tips that should hopefully help anyone who is looking to transition from working in stereo to surround.

The biggest deal breaker that I hear many Spatial Audio releases is distracting content that isn’t in the front. How often do you hear a lead vocal that’s hard panned to the right in stereo? Putting a lead vocalist behind the listener is even worse in terms of breaking the listener’s experience. This largely has to do with how we perceive sounds from different directions. Sounds from behind us will usually grab our attention in an aggressive way since we need to watch out for a tiger that could be ready to lunge at us.

In general, panning direct sounds anywhere other than the front should be done carefully as it will easily grab your attention in a way that breaks your connection to the music. In the film industry this is often referred to as the “exit sign effect” referring to the exit signs above the doors at the back of a theater. When something is awkwardly placed back there viewers will often turn around to try to find what it was that made that sound. Percussive sounds and lead elements tend to be more distracting.

Most of the time I’d recommend using everything beyond the front stereo field as a way to increase immersion through a sense of space. Feeling like you’re in the concert hall or in a stadium. Where I think it works well to send direct signals all around is when there’s an element in the mix that’s layered. It could be background vocals panned all around the listener or stacked guitars. Even a circle of 12 drummers as Hans Zimmer did for Man of Steel.

When it comes to generating “immersing” material for other speakers, the biggest mistake you can make is to just send the same signal to multiple speakers. With surround, decorrelation is key. When a similar signal is sent around, all that you’re really going to get is phase issues. Every playback system will be different and if it’s being played back in a large system like a theater, there will be people sitting all around the room at different distance ratios to the various speakers. The result will be comb filtering and not being able to discern the directionality of elements in the mix. In extreme cases there can be audible flamming.

There are many techniques to generate decorrelated material for making something more immersive. Two popular ways are with upmixing plugins and reverb. When it comes to reverb, there are some Atmos reverb plugins available but you can also create your own by using stereo plugins on different sets of speakers and having slightly different settings for crafting the space and decorrelation. When you want to keep a sound from losing directionality, a stereo reverb could be used with the L going to the left surround and the R going to the left speaker.. This keeps the reverb for a certain element in the mix confined to one side of the room. If you’re mixing an orchestra you could send some violin spot mics exclusively to the left side reverb and celli spots exclusively to the right. This keeps some separation between them instead of all becoming a single wash of reverb in the entire room.

When it comes to moving a signal around in the room, special care must be taken. I’d recommend keeping signals at the perimeter of the room instead of pulling anything “into” the room since that’ll lead to more speakers playing back the same signal and issues with correlation. If moving a sound from the front into the sides or rear, there can be issues because of the way that our hearing works. For more info on this, look into the cone of confusion and spectral splitting. Our hearing is not good at discerning the directionality of sounds directly to our sides (thanks to how our pinnae are shaped) which leads to weird effects when a sound moves into or through that region. The other issue is that on systems up to 7.1.4, there’s a large gap between the front speakers and the surrounds so panning will never sound precise. It’s really only at 9.1.6 and larger systems where you can get decent panning resolution at the sides.

The LFE channel presents many challenges. Many downmixed formats will ignore the LFE channel so whatever you send there needs to be something that the mix can live without. The level that subs are set at also vary widely (even in movie theaters) so there can easily be a 10dB window which that signal will be played back at. Lastly, sending a correlated signal can once again mess with the signal being sent to other speakers. As a result, I recommend using the LFE channel sparingly. If you feel that the mix could benefit from some use of the LFE, I’d recommend generating entirely new material for it. This is usually done by either transposing down a sound or by using a subharmonic generator plugin like Lowender or LoAir. It’s also important to low pass the LFE signal. Most LFE subs don’t sound great playing 120Hz. Please don’t send a full range signal.

The center channel can also be tricky to deal with. A phantom center signal sounds different than the same signal sent to the center channel so it’s not simply a matter of sending something to the center channel. On top of that, the Atmos binaural settings also treat centered material differently. I’d recommend experimenting on both speakers and binaurally to find what’s best for your mix.

Of course all of the “rules” I’ve mentioned can be broken. An example would be to send the same signal to the LCR. In a large room where people are sitting from the extreme left to the extreme right of the system this can help make that sound appear from the front rather than having someone on the extreme left hearing something coming out of the center speaker as being to their right. For surround music where you’re primarily targeting small playback systems I’d avoid using such techniques.

When it comes to recording in surround again decorrelation is king. There’s a paper discussing this on my website and there are a number of great AES papers regarding this such as those by Richard King. For more information on working in surround I’d recommend Alan Meyerson’s Mix with the Masters videos and Tomlinson Holman’s book Surround Sound: Up and Running.

How to Add a Sub

I’ll start off by saying that the “adding a sub” mentality is the wrong way to approach this. If you simply add a sub to your system as most people do, you’re probably better off without it. It’ll do more harm than good. It needs to be thought of as a single system. You’re essentially designing a new speaker system. If you’re adding a pair of subs to a 2-way system, it shouldn’t be thought of as 2-ways plus subs. It should be thought of as a new 3-way system.

We need to first establish why you’d want to add a sub. The most obvious and most common reason is to add more low end extension. Most small speakers don’t go very low. -6dB at 40Hz is already fairly low for small 2-ways so a sub is necessary if you want to get closer to 20Hz. When integrated properly a sub will also reduce the strain on the main speakers. This can potentially allow them to play louder. At the same time it lowers distortion by having the woofers not move as much. One interesting phenomenon that you can look up relating to this is doppler distortion. Other factors such as mechanical noise or cabinet resonances can also be improved.

The biggest issue with how most subs are added is the crossover. When not done properly it’ll cause all sorts of dips or bumps in the frequency response as well as phase and timing issues (really these issues are all related to each other). This is why so many people hate the idea of “adding a sub” yet they have no problems with larger multi-way systems. When done properly those two things are the same.

Most subs come with some sort of crossover built in and those should be avoided in most cases. The first issue is that you’re going to be running your audio through a lot of crappy parts (at least on lower end subs). The next problem is that if you’re filtering the top speakers, you’re adding a rolloff curve to something that already has a rolloff curve (unless you’re crossing over very high) which will never give you a proper crossover. In certain cases where the sub and satellite speakers are from the same manufacturer and designed to work together this may already be taken care off but you still have many problems that the manufacturer can’t predict in terms of in-room response and location of the speakers in relation to the room and in relation to themselves. Another issue is that most built in crossovers have pretty gentle slopes which means that the sub and the drivers will overlap across a wide frequency range. Not only is this likely to introduce problems from running the sub too high but it’s just increasing the frequency range where you need to get the sub and satellites to play well with each other.

In certain cases you can let the satellite speakers go down their natural rolloff and then match the sub to that. The advantage is that you don’t have to add additional filtering on the satellites. The disadvantages aside from lack of control is that in this case you won’t get any of the benefits of offloading material from the satellites to the sub. Most ported speakers benefit from a high pass filter below their natural rolloff which basically removes unnecessary woofer excursion (which doesn’t produce sound). That’s a topic for another post.

The first step in adding a sub is to pick a subwoofer to buy. Unfortunately many of the subs on the pro audio market don’t perform very well and cost a fortune. I’ve seen a number of units that start rolling off at 40Hz. To me that’s not really a sub. There are a number of units that will get you down to 20Hz for $700 or less. They come from smaller manufacturers that aren’t very well known in the pro audio world. If you’re interested in finding out more about those, reach out to me. There are also some excellent DIY “flat pack” kits where all you have to do is glue together and paint the cabinet that gets shipped to you.

The other important part of picking a sub is that it’ll mate well with the satellites. If your speakers roll off at 100Hz then you’re going to want a sub that plays extremely cleanly up to there. If your speakers go down to 40Hz then you’ll probably want a high excursion sub that gets you down to 20Hz and doesn’t necessarily have to play cleanly very high. It’s important to keep in mind that the higher a sub is playing, the more you can localize it in the room.

The next step is to position the sub in the room. If using a pair, I normally recommend placing them by the speakers. If it’s a single sub then some experimentation in placement can be beneficial. Using REW or some other measurement tool is critical. For placement, you want to focus on looking at the area where the crossover will be and below. If you’re crossing over at 40Hz then I’d focus on looking at 20Hz - 60Hz.

In general you’ll probably have the best response by having the sub close to the front wall. The goal is to get the smoothest response. Bumps aren’t too much of a problem and any sort of boundary reinforcement generally isn’t an issue either. The biggest things to avoid are dips especially around the crossover.

Once a decent spot is found then it’s time to set up the crossover. Many people will argue this but my opinion is that DSP needs to be used for this. There are many passive systems that use DSP for crossing over to the subs simply because it’s not possible with passive circuitry and even active analog doesn’t give you the flexibility needed in most cases. At the same time, more advanced forms of DSP such as FIR processing is unnecessary for this. All that’s needed is the ability to create a crossover with a slop of at least 24dB/oct (48 or 96 is preferable in most cases), the ability to time delay the subs and satellites independently, and a few bands of parametric EQ. Options include units from miniDSP, DEQX, Trinnov, dbx, and Xilica.

Once I’ve picked a crossover point (a process I won’t get into here), I start by measuring the sub(s) and satellites individually with and without the filter to see how their responses are affected. These measurements also allow you to match the volume of the speakers. The next step is to try measuring the system with them together. In certain cases it might be great right off the bat. In other cases it might just need the polarity of the subs fixed. Most likely, however, there will be some fine tuning required. The next thing to look at in REW are the phase and impulse responses. This data is used to time align the speakers. Once aligned, the phase will usually sort itself out. If after aligning and checking polarity there are still problems, it might be worth trying a new crossover point. In the case where the crossover overlaps with the natural rolloff of the sub or satellites, then EQ bands can be used to smooth that out and create the slope that you’re after.

Once the crossover has been properly set up then the last step is to add some EQ. This can be to counteract effects of the room or extend the response of a sealed sub. These are topics for posts of their own but what I’ll say is to be judicious with the amount of EQ used to counteract room issues. Around 4 bands of EQ with at most 6dB should be enough for most cases. In terms of extending a sealed sub, this essentially trades off the max SPL of the system with how low it extends. Care must be taken to not push a sub too far.

For anyone curious about my own system, my main speakers use 15” Acoustic Elegance subs which have pretty much the lowest distortion possible and an STW350 sub for my LFE which is flat down to about 18Hz. For travelling I use a 12” Ultimax sub. In my new room, each main speaker will have dual AE subs and for my LFE I’ll either add a second STW350 or switch to using the Dayton MaxX drivers.

It’s important to note that this post is by no means an exhaustive look at how to set up a sub. Anyone interested in doing this on their own should do more research in the areas I’ve covered. Shameless plug - setting up subs is one of the services I offer. This is typically included when I design rooms or set up DSP units for speakers. Whether you’re doing it on your own or having me help out, the end result should be a cohesive full range system.

My Mastering Process

Many people still find mastering to be some mysterious process and don’t understand what it’s for. When starting out it can be confusing to understand why mastering exists.

There are many different reasons and goals for mastering. Most importantly is offering a fresh perspective to a song or set of songs. The mastering engineer typically won’t be very involved throughout producing, recording, and mixing so they haven’t heard the song hundreds of times. Typically a mastering engineer’s monitoring system is as good if not better than the previous systems used in the process so they are able to make more informed decisions such as making any necessary changes to the tonal balance of a song. Then there’s the more traditional aspects of preparing a song to be released which includes getting it to the proper levels for various methods of distribution as well as sequencing an album and making sure that the songs in an album all work together. This also includes the final quality control of a song to make sure that there isn’t anything technically wrong with the files being released.

There is a lot more that could be said about the role and responsibilities of a mastering engineer but in this post I’d like to focus more on my general workflow and approach.

On some projects I will be involved from pretty much the start and may hear some material throughout the process to make any suggestions I might have but more typically I’ll only be brought onto a project at the very end once the final mix is approved or very close to being approved.

The first step after receiving files is to load them into my template. The template just includes things like routing and exporting operations prepared rather than any predefined processing and plugins. Files imported include the main mix and any alts (instrumental version, TV mix, etc.). It also includes the limited ref mix. If the project includes multiple songs then I typically work on all songs in a single session. The exception to this is if an album requires more complicated sequencing where I’ll print all of the processed songs and bring them into a new session just for sequencing.

The very first thing I do is sit back and listen through the ref mix in its entirety. This will usually be the first time I experience the song. While listening I’ll be thinking about the intentions of the song, perhaps the direction that it’s trying to go, and if there’s anything that sticks out as an issue I’ll make a mental note of that to address later.

After this first listen through I’ll have a pretty good idea of what I think might need to be done and what tools I think will work. At this point I start to play around to see what works and what doesn’t. A tool that I thought might be perfect to push the song a step further or to fix an issue might not work at all. After a few minutes I’ll settle on something that works well and then I’ll start fine tuning. At this stage it’s very much a matter of A/Bing small changes to try and hone in on the song. Of course sometimes I might end up not being happy with where I am and take a few steps backwards to try a different approach.

It’s important to mention that throughout the entire process I’m constantly A/Bing with the ref mix. This is both to make sure that the decisions I’m making are actively improving the song (taking it closer to what I envision it being) and to make sure that I don’t make things too different from what everyone else on the team has gotten used to. The intentions of the song and mix need to be preserved. Having said that, on some projects the client will want the mix changed drastically while others might want me to barely touch it. Figuring out how much room I have to play can be difficult and usually takes either talking to the client about what they’re looking for me to bring to the project or I can do what I think is best on a first pass and risk doing too much or too little which can then be refined on a second pass.

Once I’ve gotten everything refined and am happy with where the song is, it’s typically been around 45 minutes. At this point I’ll usually take a short break of 5 to 10 minutes. After this I’ll listen to the song entirely through and see if I’m happy with it. After making any necessary adjustments I’ll jump around the song and A/B with the ref mix to double check that everything is still good in relation to the ref.

If I’m working on a project with multiple songs then at this point I’ll move on to the next song. When working on albums then I also frequently jump around to compare the current song I’m working on to other songs and make sure that they work well together. Once I’ve gone through all of the songs then I’ll sequence them meaning that I determine the flow of the album. After this I’ll listen to the album all the way through and make any notes of anything I want to go back and adjust. This is often the very first time an album has been listened through entirely which is quite exciting to have that honor.

The last step in the session is for me to listen though again on headphones. This is the first QC step for me. I make sure that I didn’t miss anything on the speakers and if I had doubts about something will use this as a last opportunity to make a change. Because I get a lot less detail on headphones than my speakers, I’d say that 98% of the time I don’t make any changes following this headphone listening.

After exporting the masters at the highest resolution I bring the files in to RX for SRC and bit depth reduction. Typically the highest resolution masters are either at 96kHz or 48kHz and 24 bit. I normally use RX to generate 44.1kHz files at 24 and 16 bit.

At this step all of the masters have been created and just need a final round of QC. Usually I’ll listen through the 44.1kHz 16 bit files since any issues on the higher resolution masters would be present in these. The full mixes get listened through in their entirety. For alts I don’t always listen through entirely. If that’s the case then I’ll at least open every file in RX to compare with the full mix and make sure it all looks good. I’ll also skip through each file to make sure that something like an instrumental is actually an instrumental all the way through with no vocals accidentally left in. A 4 minute song with 4 alts would take 1 hour to listen through all of the files at all of the formats so it’s just not possible.

The only times I’ve ever had issues show up in my final QC is when I’ve used new plugins so normally there aren’t any issues here but I wouldn’t feel comfortable sending out masters that haven’t been listened through. Just because it plays fine in the DAW doesn’t mean that exported files are fine. Because of this, any time I use a new plugin (or update a plugin) I’ll either do extensive testing in testing sessions or I’ll then listen through every alt file exported until I’m confident that the plugin isn’t going to cause any issues when printing masters.

The last step is to upload the masters to Dropbox and send a link to the clients. If any revisions are necessary, then after making changes all of the exporting and QC steps are repeated.

With all of these steps, mastering a single usually takes me around an hour and a half from when I download the files to when masters are sent out. I try to make that at least an hour of listening before QC. Any revisions will add to that. The range of time for working on a single ends up being 1 to 4 hours and so my rates are essentially an average reflecting that. Projects with multiple songs typically start to move faster as I get a sense of the album.

Dolby Atmos

Atmos seems to be the only thing engineers are talking about these days. It’s something I’ve talked about for years but no one else seemed to care. I’m glad it’s finally becoming mainstream.

I originally got into Atmos around 5 years ago. My work as a scoring mixer means that I’ve worked in surround (usually 5.1 or 7.1) ever since I started out. Atmos started to become popular around 6 - 7 years ago in the film industry and theatres slowly implemented it. At that point, no DAW properly supported it and scoring mixers treated it as 7.1 plus height channels in terms of bussing.

At the same time there were also other 3D surround formats like Auro-3D, DTS:X, and the NHK 22.2. The research in this area has been done for many years and there are a number of AES papers discussing these formats as well as recording techniques for them. This includes the papers I’ve written about recording for these formats and active acoustics which you can find on my Products page. Because Atmos wasn’t very popular at the time, I originally set up an Auro-3D system in my studio but unfortunately had no way of playing any released Auro-3D so it was mostly for my own experimentation. The Auro-3D system itself was very closed off which is largely why it never caught on. Atmos seemed a little more approachable and Steinberg released support for it in Nuendo at the same time with Nuendo 7. At that point I tore down my Auro-3D system and replaced it with 7.1.2 for Atmos.

After I invested into expanding my system into Atmos, it was essentially dead and only used for a few high budget films. Atmos music was nonexistent so my system sat unused for close to 5 years. I wanted to work in Atmos as well as binaural specific mixes but there was no market for it and no distribution services supported it. The closest option was to release a separate headphone-only version of an album mixed binaurally but this brings up an important issue that Atmos solves. One of the beauties of Atmos is that, when implemented correctly, it’ll be rendered perfectly on any system. That includes in a theater, in 7.1.4, in stereo, and on headphones. No need for a second release of an album that’s only intended to be listened to on headphones. A single Atmos file does it all.

With the Apple support of Atmos, other distributors also supporting it, and the push from Dolby, Atmos is now coming to the attention of artists, engineers, and consumers. It is now possible for anyone to easily create and release Atmos content. This can either be done with Pro Tools Ultimate and the Dolby Atmos Production Suite or with Nuendo and the built in renderer. Both of these options be can done on a single machine without any extra hardware. More and more DAWs support Atmos.

While everything surrounding Atmos is great and I think there’s potential for it to be the new norm, there are still some major issues which many people are overlooking. The first issue is that Dolby is not providing content creators (studios) a way to play back released Atmos material unless you have the Atmos files of a release which are almost impossible to get (I don’t know of anywhere that you can buy Atmos files). Yes, you can listen to it on headphones but anyone who has a 7.1.4 or 9.1.6 speaker setup is going to want to be able to listen to music or watch films on their system.

With 5.1, there are a number of platforms like the Windows Netflix app which will play 5.1 out of your system with no issue. For other platforms like Prime or DIsney, it’s possible to get a Dolby rack unit which takes the digital out from a device like an Apple TV and gives you digital outs that can be plugged into your system. The problem is that this doesn’t really exist for Atmos.

The solution that most studios (including me) use is an Atmos receiver with preamp outs. This typically costs around $2000 since only higher end receivers have preamp outs. The obvious problem with this is that there’s going to be the DA on the receiver then going to an AD to get into your system so there’s redundant (and not great quality) conversion. The other thing to consider is that studios don’t typically want all of the other features that a receiver has (DSP like Dirac, bass management, various I/O, amps, etc) so you’re paying a premium for something you’re not going to use.

So how do you feed your system digitally to avoid the redundant conversion of using preamp outs? Unfortunately the cheapest solutions start at $5000. This includes the unit from Arvus (AES outs) or the JBL Synthesis receiver (Dante out). Beyond that, it’s only receivers costing more than $10,000. A studio should not have to spend $5000 just to properly play material from Apple Music on their speakers or watch some Netflix. Dolby should either offer their own affordable decoder box with AES (and/or MADI) or offer a way for Atmos to be decoded natively in Windows so that something like Apple Music can play directly out on any interface. While this is a major oversight on Dolby’s part, this isn’t the biggest problem for Atmos.

The great thing about Atmos is it’s ability to play back on any device. Music in 5.1 is never going to catch on because no one has a 5.1 system. The majority of people listen to music on headphones and Atmos is able to beautifully translate 3D audio into headphones. Once everything is properly implemented, the end user doesn’t have to even know what Atmos is. The problem is that it’s not as simple as playing the binaural version of a mix. This simply doesn’t work.

Binaural audio is essentially a way of tricking our ears into thinking that we’re hearing spatial cues around us when it’s only coming from 2 speakers (1 on each ear). Because we all have different ears and hearing systems, the processing that simulates this can’t be applied to everyone. Doing so is like wearing someone else’s glasses. Most of the time you’re not going to have a good time and might run into a wall. Personally I haven’t heard any Atmos mix on headphones that didn’t sound awful and practically made me nauseous. It’s because what I’m hearing wasn’t made for my ears and so it’s like I’m hearing the world through someone else’s ears. My brain can’t understand what’s going on. For anyone interested in digging more into this, it’s all about the head related transfer functions (HRTFs). Research in this field has been done for decades (including by Dolby).

There is a simple solution for this. Most of the data needed to create a binaural render for a specific individual is based around their ear and head shape. With a few measurements or pictures, those parameters can be set and stored to make any binaural mix play properly for that individual. If there isn’t a system implemented that factors this in to binaural Atmos playback, I think that Atmos will die out because the content won’t sound very good for most people.

How do most people consume music? On their phones. Isn’t it convenient that our phones have cameras? All it takes is moving your phone around your head for it to scan you. There are already systems that do this but unfortunately they aren’t industry wide systems. There needs to be an industry accepted way of doing this. Our phones already scan our fingerprints and use facial recognition. It’s just one simple additional step to add when you get a new phone.

The other factor that needs to be considered is the type of headphones or earbuds being used as that also affects how a binaural render is perceived by a listener. With wireless options being increasingly used, it’s easy for our phones to detect what we’re listening on and adjust accordingly. Otherwise there can be a setting where you specify what you’re using.

Once the integration of HRTFs takes place, I think Atmos will become the norm for the recording industry and consumers don’t even have to know what it is but when they listen to a stereo project, they’ll feel that something is lacking.

You might be wondering what my role in Atmos is as a mastering engineer and that’s still something being defined. On one hand I can take someone else’s Atmos mix and make any necessary tweaks to get it ready for release as is the case for my usually mastering work. On the other hand, for Atmos, I can take on more of a mixing approach. This would be either taking stereo files and exploding it out into Atmos or taking a mix done binaurally and making sure that it works well on a full Atmos speaker system.

Because I’m taking on this finalizing approach in the Atmos environment, my new studio being built in the next little while will have one of the best Atmos systems possible to make it truly an Atmos mastering room. This includes custom speakers with complex DSP built in (similar to the Kii Three’s or D&D 8C) for phase and timing correction across all speakers. Fully digital monitoring means that the only stage of conversion happens in the speakers after the DSP processing with the DACs going directly to the amps which go directly to the drivers. In addition, all speakers will far outperform the Dolby specs. The system will initially be 7.1.4 and then will be expanded to 9.1.6 depending on how successful this format is. As for the system in my current studio, it is 7.1.4.

The beauty of Atmos is that anyone can do it with a pair of headphones. You don’t need a 7.1.4 speaker system to work with it. All you need are the software tools. Having said that, it’s important to check on a speaker system before release which is where I fit in and am able to provide that last step. If anyone has questions about this workflow, get in touch. I encourage everyone to start working in this format as it can lead to some great material even if your focus is on releasing a stereo mix.

I predict that in 3 - 5 years Atmos will either be gone and forgotten or the HRTF systems will be implemented and it’ll be everywhere. I don’t see any other option that works sustainably. Let’s see if I’m wrong!

The Best Plugin You've Never Heard Of

There’s a major issue in the music industry. It’s largely what drives the industry. I’m not sure who’s really responsible for it but I think we’re all responsible for falling into the trap of it at some point in our own journey.

In order to produce, record, mix, or whatever it is you’re interested in doing, it requires an investment to some degree. You need a way to get sound in to and out of your computer, a way to listen to your music, a way to record, a way to manipulate things in the computer.

Most people starting out will do some sort of research whether it be online, chatting with friends who are already in this world, or by going to your local shop and talking to a sales person. You probably have a limited budget especially if you have no idea where this journey will take you. You probably start off with something like an SM58, basic Focusrite interface, and some inexpensive monitors like the JBL, Kali, or KRK. At this point you’ll probably also decide on a DAW to work in.

Once you have the basic gear and can get going with you music making, you still need to learn how to use the gear. It’s a steep learning curve depending on how far you want to get into it. This means more research. This is probably the point where the industry needs to radically change. The problem is the endless hole that people get sucked into. Most resources like forums and YouTube videos only discuss gear. When you look up what a compressor does, you’ll learn about all of the awesome compressor plugins you don’t have. All of the awesome outboard gear that you need to get great sound.

Are there some cool plugins around? Yes. Is there some outboard gear around that’s awesome? Yes. Do you need it? No. Is it what you should spend most of your time talking about with other engineers? No. Is it going to make your work better? Probably not.

In my personal experience and what I’ve seen others talk about, a large part of progressing in your career is getting beyond the gear and moving the conversation on to other things. For a long time I was focused on the gear and it took some mentorship as well as being around other professionals to get past that point. If I didn’t have those experiences over the course of about a year, it would’ve taken me probably 10 years to make that same jump on my own.

Yes, you need some gear to work. There’s no getting around that. What’s important is figuring out what you really need both in terms of what you can currently afford and what you ultimately want to have. Most people seem to prioritize the wrong things entirely. The most important part of any system is the monitoring. That mainly consists of the speakers and the room. Without that, you’ll have no idea what you’re doing unless you have a lot of experience knowing how to work with compromised monitoring. If your monitoring system isn’t great, why are you buying plugins or outboard or a new mic pre? You probably already have tools that are good enough for that.

When starting out you probably can’t afford to build a nice room and great speakers so some level of compromise will have to be made. Once you have the basic gear to get started then this is where everyone should evaluate their priorities otherwise you’ll be stuck in the endless loop of buying new gear and the only thing you’ll probably talk about with other engineers is gear. This is probably the point where you should invest in your business, save for improving your monitoring, or not spend at all because it won’t give you any meaningful return.

If you want to work in this industry then you’ll eventually need great monitoring. There’s no way to get around that. Speakers like ATC seem like they’re a fortune (far too overpriced in my opinion but that’s a separate issue) and when you’re starting out it may seem like something you’ll never be able to afford or like it’s an unnecessary luxury. At some point you’ll hopefully be at a point in your career where you need something on that level. Without planning for that you might have 10 awesome mic pres costing a lot more than a pair of ATCs and terrible monitoring. In today’s world this probably applies mostly to plugins. How much is that $2 Waves plugin going to help your work? How is it going to help you develop your business?

Once you have great monitoring figured out then perhaps you might want to get a piece or two of outboard. Things that really add value to your work. How many plugins can you really actively use? In my mixing work I probably use at most 10 different plugins on a large session and those 10 plugins are probably the same 10 I use 90% of the time. With mastering, I use a different set of tools but again, I don’t have 50 plugins to browse through and find whatever is popular this week.

Nowadays when I see a studio with a huge desk or console and walls lined with outboard I immediately know that whoever owns that has the wrong mentality and it’s likely no fault of their own. What does a great studio look like to me? Nice speakers, copious amounts of treatment around the room (no foam), and no large desk. After that then perhaps there can start to be some outboard gear or things like that but those fundamental things should be there from the start at any great studio.

When I first started out I had the biggest desk I could find to put in all of the gear I wanted to buy. I also had all of the foam on the walls. This is what the internet told me I need to do. It took a long time and a lot of research to move beyond that and eventually have the smallest possible desk which I’ve had for quite a few years at this point. It’s great to see people like Jesse Ray Ernster and Unf*ck Projects making a push for that more recently. If I were just starting out now with no gear I’d probably not buy 70% of the gear I’ve owned. If I didn’t have the right guidance a few years ago then I’d own even more unnecessary gear and software.

What’s the solution to this problem underlaying the entire industry? I’m not sure. Probably mentorship from engineers who have gotten past the point of being fueled by gear. Of course if you’re just starting out and you don’t live in a major music center, that’s going to be tough to find. Unfortunately there’s too much on the internet saying otherwise so any new resources will have a hard time getting through. This blog post was largely inspired by the Conversations podcast where this is one of the many topics discussed. It’s a lot of content to get through but for anyone interested in progressing through their journey in this industry, I think it’s a time commitment worth pursuing.

Having said all of this, it’s always fun to experiment with new gear and I may occasionally post about whatever new tools I’m trying out. Just do so with caution and remember that it’s only a small part of where our attention should be.

In response to the title of this post - you probably already have all of the tools you need. There are probably better things you can do with your time and money instead of looking for the latest flashiest plugin. I’m certainly no expert and still have a lot to learn but feel free to reach out to me if you want to discuss where might be the best place to invest for your studio and career. Hopefully I can give some advice that’s a little better than what you’d otherwise find online.

How I use REW

After hearing someone mention how most people only look at the frequency response graph in REW when working on treating their room or setting up speakers, I figured that it might be helpful for me to run through how I use REW for my own studio and when I’m consulting for others. What I won’t be covering here is how to deal with the problems that you might see in the graphs as well as what are acceptable results.

At the most basic level I look at the frequency response graphs to get a general idea of how a system is behaving. In this case I’m looking at the overall shape of the curve, any large bumps or dips, and where the system rolls off. I find this graph useful for finding dips that may need to be treated. This is mostly a starting point but it’s also useful when moving speakers around the room and trying to find the best spot. When looking at this graph it’s important to set the scale of the Y axis. If the range is too large, anything will look like a flat line. This is one way which many people try to deceive others. The smoothing is also important to set. If it’s set too high then again, anything will look like a flat line. I generally use 1/24 smoothing keeping in mind that many of the fluctuations shown with this smoothing aren’t audible. The psychoacoustic smoothing gives a better idea of what’s audible.

The graph which I find to be the most useful is the spectrogram. This is where I look at decay times to see where there are potential problems. I generally avoid the waterfall graph. Although it can give a lot of insight into the decay behavior, the range and time window set will drastically affect how the graph looks so it can be finicky to set up. Again this is one way which people mislead others to make their room seem like it has no issues. I find the spectrogram to be more straightforward with the stock settings.

The decay graph is again another representation of the decay behavior which can be useful in seeing how the frequency response changes through time. Ideally each slice interval would have the same frequency response. The more that a slice interval deviates from the initial response, the more likely that there are decay problems.

The phase and group delay graphs can be very insightful but for the purpose of treating rooms, it doesn’t normally offer too much useful information that will affect treatment or speaker placement. I use these graphs primarily when designing speakers or setting up more advanced DSP correction systems.

The impulse graph is the most useful graph for understanding higher frequency reflections happening around the room. Both the dBFS and %FS display modes will make problem reflections visible and easy to see if treatment in those spots are effective. The timing of those reflections can be used to track down where in the room those reflections are happening.

The last graph that I frequently look at is the distortion graph. When treating rooms it doesn’t offer much useful information. This graph is mostly used for designing speakers or making sure that a system isn’t reaching its SPL limits. I mainly use it to compare speaker systems. It’s somewhat disturbing to see how high the distortion is on many high end speakers.

The RT60 graph with the EDT curve is one what’s frequently talked about and while it does provide some useful information, I find that it doesn’t give me anything that I’m not already getting from the other graphs.

When it comes to integrating subs into systems which I typically help studios with, I’ll be looking at the frequency response, phase, and time alignment using the impulse graph. These are also critical for setting up surround systems. It’s not always possible to get clean results given the constraints of the equipment being used for the crossovers and other DSP but there’s usually some room to play around with and find the best result. I believe I’ve mentioned in a previous blog post that simply adding on a sub to a system or going through the crossover built in to subs will usually cause more harm than good. It must be designed as a single cohesive system taking into account the natural rolloff of the speakers, the phase around the crossover, and time alignment of the speakers. In general the lower the crossover, the less critical these factors considering the larger wavelengths.

Hopefully this post can help studio owners get a better sense of what’s going on in their room instead of just looking at how smooth the frequency response looks. Of course at the end of the day, every system needs to be auditioned since our hearing is much more complex than what these graphs show. It’s one of the drawbacks of consulting remotely but using REW to make effective decisions and recommendations leads to a great starting point which can then be tweaked.

Clocking and Why I'm Never Buying Antelope Products

I’ll preface this post by saying that I don’t have much hands on experience with high end clocking. I’ve been in plenty of rooms using very expensive clocks but haven’t had a chance to A/B those. Most of this post will be relating to the theoretical aspects of clocking. Now, I’m the first person to say that theory has very little bearing on what’s actually audible but I hope that this post can make you question certain products on the market and their marketing. They may sound fine but the marketing promotes the wrong ideas.

For anyone in the mixing or mastering field, I strongly recommend reading the following article. This post is largely based on that article. Unfortunately the images on that article don’t seem to be available anymore.

https://pinknoisemag.com/pink-papers/pink-paper-002/

What do you want from a good clock (and cables for clock transmission)? Low jitter. What is jitter? Basically variations in the clocking. One cycle of the clock may be a little early or a little late. This can be caused by the clock, distortions in the cable, problems in the receiving piece of gear, or any retransmitters in the path. Jitter results in the sample being played (or recorded) ahead or behind where they should be which distorts the audio. This normally translates to high frequency noise and lack of clarity.

As you can see, we need clocking (for the sake of simplicity this includes cables and everything in the clocking “path”) that’s as stable as possible. No variations (jitter) caused by any kind of instability or distortion.

Nowadays there are countless clocking options on the market. Some better than others. The article linked to includes comparisons of various clocks on different converters (and their internal clocks as well). One of the biggest selling points when it comes to clocking is “atomic” rubidium 10MHz clocks such as the Antelope 10MX. On the surface it seems like a great idea. It’s worth pointing out that these units are little more than an off-the-shelf oscillator in a box. The oscillator unit itself costs $1500. How Antelope justifies $6500 for the 10MX, I’m not sure.

These 10MHz clocks will supposedly stay in sync for years which on the surface seems like a great idea. Essentially if you set up 2 separate units, years later they will still be in sync with each other. The problem with this is that in audio we generally don’t care about things staying in sync for that long. If in 1 hour the clock has drifted by 1 sample, no one will notice unless maybe you’re recording a single take for multiple hours. Even then, I believe the drift from non 10MHz clocks is much less than that.

The problem is that these clocks aren’t made to be stable in the short term. They may not drift but they have higher jitter. It’ll make sure to put out a pulse at every interval but that pulse may not be at the perfectly correct location in time. 10MHz clocks do not belong in audio. Audio uses require clocks which pulse at the perfect timing interval regardless of if that eventually drifts by a little which wouldn’t be noticeable. This is how you get the lowest jitter.

Learning this should make you question Antelope’s product line. Their top clocking option is the 10MX atomic clocks. These units are used to improve both their crystal clock units (ie driving a non 10MHz clock with a 10MHz clock) and their interfaces which accept the 10MHz clock signal. I have no doubt that adding the 10MX to their other products greatly improves how they sound. If 10MHz clocks aren’t what we want yet they improve the sound of their units with the non 10MHz clocks what does this say about the quality of the clocks they’re throwing into their products? I believe they’re purposely shooting their own products in the foot to make the 10MX be a nice upgrade (and gives them $6500…). As a result, I stay away from all Antelope products.

A couple of engineers I know who own the Antelope clocks (10MX or the older 10M) have switched over to non 10MHz clocks which cost a fraction of the price and they say sound better. These units include the Black Lion Audio MKIII XB and the Grimm Audio CC2. In my own system, I don’t really have the option of using an external clock but if I did, I’d be using one of these two units.

One thing I haven’t touched on is whether something like a DAC being used on its own will sound better with an external clock. As far as I can tell, it seems that different units behave differently so in certain cases they can be improved and in others it’ll sound best with internal clocking (and any other great slaved to that unit).

One last thing to mention is that clocks transmit a square wave which the receiver has to look at and determine when to “switch” to the other position. A cable (or anything else in the signal path) can affect how this square wave behaves by rounding off the sharp corners. This makes the receiver have some level of “confusion” knowing exactly when to switch position. Again, this results in jitter. While it’s just sending 1’s and 0’s, the quality of those 1’s and 0’s is very important to having good clocking which is why the cables used for clocking (and any digital connection carrying clocking) can make a big difference.

GW Model 4

Update: PDF now available on my Designs page going through how to build your own GWM4 and everything that goes into it.

In this blog post I’d like to talk about some of the background behind the GW Model 4 speakers I’ve developed and cover some of the design process.

Over the past few months I’ve seen many engineers in a number of social media groups and forum threads asking for recommendations for smaller fairly inexpensive speakers which are appropriate for mastering. The Barefoot Footprint 01 which are priced at $3950 USD are a popular choice for this. I decided to see if I could make something for a similar price that offers at least an equivalent level of performance. The other major motivation that I had behind this project is that very few speakers fully use the potential of DSP available nowadays and I’d like more engineers to be able to experience the benefits. Far too many engineers think that their passive speakers are the ultimate solution. More on that later…

There were a couple of design goals I wanted to achieve in order to have a fantastic speaker for use in smaller mastering studios which are increasingly common. These are certainly not the ultimate speakers but for their “class” of speaker I think they are impossible to beat. I wanted a speaker priced under $4000 USD with extended low end (down to 30Hz), low distortion, great off-axis performance, SPL levels appropriate for mastering, compact size, use at 1m - 2m (nearfield), and fully utilizing the power of modern DSP. These are essentially a small version of my main speakers. I can’t incorporate all of the technology from my main speakers into something at this size and price but the result has exceeded my expectations.

Speaker design is all about tradeoffs and these are no different. Some of the main parameters which need to be juggled are how low the speaker extends, the size of the cabinet, the sensitivity (how many dBSPL produced per unit of power), how much power is required to drive the system, and maximum SPL levels. As the cabinets get smaller, it’s increasingly difficult to produce more low end. You essentially need to put more power into it in order to get the same low end performance which means higher power amplifiers and woofers which can handle that amount of power. This also ends up sacrificing the maximum SPL levels. If I were designing a similar system which only went down to 60Hz then I could design it in a way that it could play significantly louder. Based on the fact that I was designing a compact system and that it goes down to 30Hz (-6dB point) means that the max SPL levels had to be sacrificed. While this system may not play as loud as similarly sized speakers, I ensured it can handle the levels that I master at which I believe are fairly standard. I would not recommend using these speakers for tracking where you’re dealing with loud uncompressed transients and trying to fill the room for clients. Having said that, in comparison to the average 7” studio monitor, these can play louder and have lower distortion thanks to the incredible Purifi woofer being used. If this woofer did not exist, these speakers would not be possible.

There is a lot of debate around sealed vs ported speakers online and much of it is based around misinformation. One system is not inherently better than the other. Both can be designed very poorly or very well. If sealed were inherently better then the top speaker manufacturers like JBL, ATC, and B&W would not be making ported systems. The way that I like to think of it is as a relocation of the low end energy. With a sealed system you get a gradual rolloff whereas with ported you’re taking that lower rolloff energy and moving it up higher in the frequency range so that you get more output but a steeper rolloff below that. Unfortunately an important part of ported speakers which is overlooked in many systems is applying a high pass filter below the tuning frequency. Below where the port is working the woofer essentially moves without producing sound which just causes distortion. Removing this unnecessary energy cleans up the sound but unfortunately isn’t possible with passive components.

One important factor when designing a ported system is the air velocity travelling through the port. If it is too high, it will cause distortion from not being able to move through the port and will cause chuffing noises. A great ported system should have low air velocity at high SPL levels and this speaker was designed with that in mind which did result in sacrificing some of the compactness of the cabinet to have a longer port.

Another common debate is passive vs active crossovers. Again, both can be implemented very poorly or very well. A great passive crossover can make a fantastic speaker but that speaker could be made even better with an active crossover (and better yet with a DSP crossover). A passive crossover introduces all sorts of parts into the signal chain which degrade the signal, waste power, and make amplifiers misbehave. I believe there are 3 reasons why they are still prevalent -

  1. Many swear by passive and aren’t willing to have their minds changed

  2. In general active systems have the amps built into the speakers and audiophiles want to be able to switch out amps

  3. Cost - extra amps and extra DACs in the case of DSP. Most people aren’t willing to make this investment

A DSP crossover introduces no components neither between the DAC and amp nor between the amp and drivers. It also allows for many more intricacies in the shaping of the slopes of each driver that allow them to perfectly cross over. It would require hundreds of parts to reproduce this with passive components. I believe that any passive speaker will be improved by removing the passive crossover, using one channel amplifier per driver, one DAC channel, and being calibrated correctly.

The GW Model 4 were designed to take full advantage of DSP which very few speakers currently on the market do. This is similar to having a DEQX or Trinnov built into each speaker. When I first started this project I was having a hard time putting together a system with would allow this as there aren’t any widely available that offer the processing power and I/O that I needed. Fortunately I was referred a company which offered a unit that had every feature I could’ve hoped for. At the moment I’m not willing to share which company this is but I can say that they are using the latest technology on the market offering more processing power than anything else around. Each speaker has a SHARC chip in it with excellent ADC and DAC sections.

The first area which the DSP deals with is linearizing the response of each driver. This includes both the frequency and phase responses which results in an incredible amount of resolution similar to what a DEQX provides. The second area is the crossover filters. This perfectly tailors the response of each driver to the desired crossover slope and also carries out linear phase processing for no phase shift. The last area is filtering for room correction. No studio is perfect and so I believe that every system benefits from correction EQ although it must be expertly implemented. It’s not simply a matter of inverting the response curve of the room.

With all of the processing running, roughly only 70% of the processing power is used plus less than half of the memory. In the future I may further tweak the filters in order to take full advantage of the processing power available but for now it is running everything that I’d like it to. Another potential future use of this processing power is to offer a digital output on each speaker in case a user wants to add a sub on each speaker (to extend below 30Hz and have more output power). This would provide the crossover and response correction for whatever sub is used for perfect integration with the system. Currently this digital output is not on the speaker but could be added by simply installing an additional XLR jack and wiring it to the DSP board.

All of DSP on the speakers does add latency. For mastering situations this is not an issue. Regardless, a switch on the back of each speaker allows it to perform in a low latency mode. This changes some of the filtering which results in an almost identical frequency response but sacrifices some of the sonic resolution. Other switches on the back allow the selection of analog vs digital input and a flat curve vs a room correction curve.

Following are some measurements showing the on and off-axis response of the speaker. These are windowed measurements meaning that they are essentially anechoic. Because of the windowing, these are only accurate down to around 150Hz. Below that the measurements are not correct. Unfortunately I would need to either measure the speakers in an anechoic chamber or outside at a higher distance off of the ground to get meaningful measurements below 150Hz.

The important thing to note in these measurements is not the flatness of the curve as that can easily be EQ’d to suite any user’s personal preferences. The point of these measurements is to see how little the response changes off-axis. It isn’t especially hard to make a speaker which is flat on-axis. Improving the off-axis response is where things get trickier. The DSP as well as the use of a waveguide allow this speaker to have more consistent off-axis response than most speakers around. I was very surprised by the performance which these measurements revealed. Intuitively it seems that only the on-axis sound would matter but it’s the off-axis sound which reflects in the room so it ends up greatly affecting the sound quality.

Horizontal at 15 degree intervals going from 0 to 60 degrees -

Horizontal.PNG

Vertical at +/- 15 degrees -

Vertical.PNG

Part of the package included with these speakers is a calibration session with me. This gets the speakers tuned to your room and preferences. Proper setup is paramount to getting a great sounding system. Many people have questioned why I’m offering this instead of letting people do it on their own or including a copy of Sonarworks. I believe that the system would not sound anywhere nears as great and so I will always include this personal remote setup service with any speakers that I sell. These are skills that I’ve acquired after tuning a number of studios around the world. If that means I can’t process as many orders since I only have so much time then so be it. The calibration process typically takes around 3 - 4 hours and a follow up session to make any additional changes that the user may like. I’m also willing to offer an additional calibration session if the user moves to a different room.

Why Model 4? Where are models 1 to 3? Those are larger systems which are mostly still at a conceptual stage but can be built as a custom order. They are all designed around the same principles with the same DSP and amplification units. The difference is that they’re larger 3-way systems for use at 2m and farther. There may also be a Model 5 released at some point which will be a smaller speaker with a more limited frequency response range.

When it comes to comparing these speakers to similar units available on the market, it’s easy to see that these are being sold at a very low price and will outperform anything at a similar price. The first 5 pairs are available for $3300 USD per pair and after that the price will most likely go up to $4000 as I would have to prepare for a larger scale production run of these.

One commercially available system which is very similar to mine are the Jones-Scanlon Baby Reds. They use almost identical parts (although set up in a different way) except the tweeter although they use a similarly priced one. That system sells for around $5000/pair. Another similar system is the Ex Machina which is $8000/pair and again use a very similar DSP system and other similarly priced parts. Of course those are 3-ways but in terms of the parts cost that would add perhaps $300 per speaker in parts cost to my speakers if I went that route so there’s still a decent comparison to be made.

In terms of other systems on the market which employ similar DSP, there are the Kii Three, D&D 8C, and Meyer Bluehorn all of which are considerably more expensive. With the price that I’m offering these Model 4’s at I’m hoping that it allows more engineers to experience high end sound and the potential of the DSP which is only starting to entre the market.

If you’re interested in trying these out, get in touch and I will add you to the demo list. I’m willing to cover some shipping charges within North America but keep in mind that I’m prioritizing those who are willing to cover shipping and are keen on potentially buying these in the near future.


ADD-Powr Sorcer 4x

Over the years I’ve tried a number of different power products in my studio. Originally I wanted to move away from a power conditioner and find something that just offers surge protection for my system. The problem with most power conditioners, at least the more inexpensive ones, is that they round off transient peaks with the filtering they employ. This can be readily heard on a resolving system. I find that far outweighs the benefits of the filtering they provide.

Eventually I ended up with a simple surge protector from ZeroSurge. This unit did the least harm compared to plugging gear straight into the wall. Eventually I came across the ADD-Powr Sorcer 4x at a studio in LA. I had the chance to experiment with it there and ended up ordering one for my studio. These units are only used by a handful of the best studios such as Becker Mastering.

One of the amazing benefits is that it runs entirely parallel. Nothing is plugged into it like with power conditioner. This means that it has no effect on limiting transient peaks. The unit simply has a power connector and a power switch with an LED indicating that it’s functioning properly.

The Sorcer 4x provides a night and day difference on my system. Tonally things are pretty much the same but there’s an added layer of realism to the soundstage and increased width. It interestingly pushes certain elements in a mix forward with a warm sound similar to how tube amps behave. This is done entirely in parallel on the power grid in the studio.

The Sorcer affects gear in 2 ways. The first is any gear plugged into the power in the house. Right now the unit is in my studio but I’ve connected it directly to the main breaker panel in the house and the effects were still audible in my studio. The second way which it affects gear is with coils similarly to the Add-Powr Symphony units. These coils radiate EMF into the area around the unit. Any gear that’s in close proximity to the unit is sonically affected.

In terms of how the unit works, I only understand it to a certain degree. There is plenty of information on the ADD-Powr website but much of it is not clear. I’ve been told that the unit behaves like dither for your power. The idea is that it generates low frequencies into the power line that mask unwanted harmonics of 60Hz which are normally present. This in turn affects how power supplies behave. The Sorcer 4x generates the most in this regard and is able to affect a number of studio rooms in a facility.

In a quest to limit the number of cables and wires in my system, I incorporated my Sorcer into a power unit I built. This unit includes surge protection from ZeroSurge, the Sorcer, and 6 duplex outlets all in a single box. This puts the Sorcer in close proximity to all of the outlets used in my system and eliminates cables connecting to the ZeroSurge unit. Making the transition to this unit did result in improved sonic qualities. Some of the duplexes I used previously were replaced with cryogenically treated ones but I’m not sure if that made any sonic differences.

In terms of other ADD-Powr units, I’ve also tried the Electraclear and the Symphony. Both provide sonic improvements but in my system already with the Sorcer 4x, I found them to not be necessary. The Symphony is particularly interesting to use around mic preamps.

One thing to keep in mind with the Sorcer units is that they can’t be used on balanced power systems. Certain power conditioners and transformers will create a balanced power line which this will not work on. I’ve also heard that the Sorcer units don’t play well with the PS Audio PowerPlants. At some point I would like to try out a PowerPlant to see if the benefits they provide outweight the benefits of a Sorcer but those are significantly more expensive for a high wattage system. The beauty of the Sorcer is that by it being in parallel, there’s no need to be concerned with what sort of load it can support.

File Management and Backup

Not the most interesting of posts but keeping system and project data is an obviously important task when you rely on computers for all of your work. My way of doing things won’t work for everyone but it may give you some ideas for designing your own system.

Both my OS and active projects mainly reside on the same drive. This happens to be a 500GB NVMe drive which has been enough most of the time although there have been some occasions where I had to move active projects onto other drives. This tends to happen when I’m mixing certain film scores where the film alone can take up 100GB. In the past it wasn’t a good idea to have both the OS and projects on the same drive but with the bandwidth of an NVMe drive that’s not an issue.

Next I have a SSD reserved for Dropbox. Dropbox store both my personal files and is used on a number of projects either for back-and-forth work or just delivering files. In certain cases I’ve worked directly off of the Dropbox drive when it didn’t make sense to copy everything over to my main drive.

Other than this, in my computer there are 3 other SSDs which are for sample libraries. Nowadays I only use these for the occasional orchestration job. There’s a total of 1.5TB which isn’t enough for all of my sample libraries so there are a few that I rarely use which live off of my system.

It’s important to note that there are no HDDs in my system as the noise generated from those drives is well above the noise floor in my studio so they end up being a major distraction and just limit the dynamic range that I can hear out of my system.

Outside of my studio I have 3 storage systems. The main one is an 8TB NAS which stores archived projects, files like my music library, and backups. This NAS uses a RAID 1 for redundancy. Whenever I wrap up on a project I’ll zip the folder and move it from my main drive onto this NAS. In terms of my backups, I use Acronis to automate my backup system. At the end of every day it backs up my main OS/projects drive as well as my Dropbox drive. At any point in time I can roll my system back to what was on it at the end of the previous day. I lose at most one day’s worth of work.

The next system I have outside of my system is another 8TB drive on the network. This mainly functions as a backup to the main NAS. Acronis copies over any changes made to my project archive on a monthly basis. Acronis also creates a monthly backups of my OS/projects drive. I also keep a backup of other files like my music library but I copy any changes made to chose manually.

The last system that I have is a 4TB offline drive. I manually copy my projects archive and personal files onto it on a quarterly basis. Ideally this drive should be stored off of the premises but I haven’t gotten around to doing that.

In the future it would be nice to have everything backed up to the cloud but at this point I have over 6TB of data to be stored which quickly gets expensive in subscription fees.

My Approach to Studio Design

Throughout the past 100 years or so there have been many different approaches developed for designing control rooms. Pretty much every approach has its followers. The way that I generally design control rooms incorporates elements from a number of traditional approaches. For more specific information on studio design principles and philosophies, there are a number of great websites and books such as the Master Handbook of Acoustics, Philip Newell’s Recording Studio Design, and Floyd Toole’s Sound Reproduction.

When compared to other approaches, I believe that what I like to do most closely resembles Northward Acoustics’s FTB designs but done to a lesser extreme since most people don’t have the luxury of losing so much floor space for treatment, having permanent construction alterations to the room, and of course, the cost.

I start by splitting rooms into 3 zones. The front which encompasses everything up to a little in front of the listening position, the listening position which is the area to the sides of and above the listening position, and the rear which is the rest of the room behind that. In general, I like to absorb all of the first reflections regardless of what zone they’re in. Using other techniques can lead to a wider sound but you trade off for precision in imaging. The front wall reflection point is a little less critical since you don’t get too much high frequency content travelling backwards from the speakers.

In the front zone, I like to have as much bass trapping as possible (using diaphragmatic absorbers as discussed in a previous post). The low end pressure has a tendency to build up around the speakers so I like to treat this as early as possible. This generally involves using large panels across the front corners as well as thick clouds.

In the listening position zone, I start to ease back on the low end absorption. In rooms with lower ceilings it can be helpful to use clouds here as well. This is the position where I’ll use more reflective and diffusive elements. This isn’t to interact with the speakers but rather for the comfort of the people in the room. This use of diffusion is very similar to that of Northward Acoustics. It helps with not feeling like your brain is getting sucked out of your head when you sit in the room either on your own or talking to other people. Of course some absorption in this zone can be beneficial depending on how it interacts with the room modes.

The rear zone is where I have the most freedom. The first thing which I always do is use a large bass trap on the back wall and potentially corners. This is where I generally put the thickest absorbers which the project will allow. In my own studio, I use a 12” thick panel along the back wall which has a number of different diaphragmatic materials inside. This also absorbs the rear wall first reflection point. I’m not a fan of placing diffusers there as again, while it can create a more pleasing sound, it takes away from the imaging.

The rest of the walls and ceiling of the rear zone I vary depending on the needs of the project. I’m very careful in this area to maintain an open sound as this is generally where clients will be hanging out and talking. I use a very careful balance of high frequency absorption, diffusion, and reflection which can always sit in front of diaphragmatic absorbers. This can also be used as a recording space. In my own studio, I’ve recorded a number of singers as well as guitar with excellent results. It’s a dry sound but very neutral and open. These parts of the room don’t react all that much with the speakers (other than the modal behavior) so I don’t worry too much about that.

In the studios I’ve designed, I use a variety of materials as mentioned in my diaphragmatic absorbers post. In terms of porous absorbers, I generally use Roxul Safe n’ Sound. I rarely use 703 as it normally does more harm that good. I’ve found that 703 is full of resonances and reflective behavior. There’s also the issue that you really shouldn’t use it beyond 4” thick. This has to do with the gas flow resistivity and acoustic impedance. In general, as your panels get thicker, less dense materials will provide better absorption. 703 is technically more effective in 2” panels than Roxul but it has the issues I previously mentioned so I find that Roxul ends up making rooms sound a lot better. Where I do use more rigid materials similar to 703 is in some small panels I like to use similar to those used by Golden Acoustics. I’ve found that using them in small pieces gets rid of the resonances.

One important thing to note with porous absorbers is where to place them when using them for low frequency absorbers. Contrary to popular belief, putting them in corners is the worst place to put them. Sound has both a pressure and velocity component to it which are inversely related. Yes, corners are where you get the pressure build up but porous absorbers work based on the velocity component. The reason that people put porous absorbers across the corners is that it’s the most convenient way to get the most distance away from the wall where porous absorbers get more effective. You can easily get a panel across a corner having a distance of over 12” away from the corner. Putting panels that are 12” away from the walls is generally not doable in most situations. By carefully studying the modal behavior of rooms, You can get more absorption with a panel on a wall away from the corner than a panel sitting across a corner. Despite this, I still normally put large panels across corners as it’s convenient for getting good distance away from the wall and provides a more broadband absorption.

When designing rooms, using a combination of measurements and listening is critical. Just going off of measurements likely won’t give you great results. After years of experimentation I can design rooms without necessarily having to listen by going off of my previous knowledge of what works and what doesn’t but many of the things I do either don’t make a difference in the measurements or actually make them worse but improve the listening experience. I generally use measurements to have a better idea of what problems I’m dealing with, how much treatment is necessary, and where to best place low frequency absorbers. Later on in projects I’ll continue to take measurements to see how well certain issues are responding to the treatment and to get a general idea of the final measurements in a room.

Unless one uses exorbitant amounts of treatment, a room will never be flat and it’s important to acknowledge that. Large peaks must be brought down and dips need to be filled in to the best of your ability. The most important factor is the decay time. No amount of EQ or DSP can deal with issues in the decay time. What EQ and DSP can deal with is flattening the rest of the room (within reason) after the treatment has done its job. I believe the EQ/DSP is critical in any studio regardless of the amount of treatment done to the room but of course high quality units and careful tuning needs to be done otherwise they’ll do more harm than good. In the box EQs can work well, Trinnov is a fairly good external unit, but IMO nothing beats the DEQX units. Even acoustic treatment can do more harm than good if not applied properly…

One thing I haven’t mentioned is the use of active acoustics. While I’ve done some research on low frequency absorption via active means, I haven’t applied it in any of the rooms I’ve designed. It can be very beneficial but I believe that traditional means need to also be employed in order to achieve great results. Where I have explored active acoustics more is in performance and recording spaces where they can be very useful. I may write a blog post about this but for anyone interested, you can find a paper I wrote on this on my Products page.

Tube Microphone Design

I wanted to share a little bit about the story behind the tube microphone I designed (term used loosely) and the process that went into it.

My microphone is essentially a clone of a clone of a clone. It started with a pair of microphones owned by Ken Goerres that I was fortunate enough to get to use in LA. These were built by Howard Gale under the brand Sonic Integrity Labs. I know very little Howard other than that he was known for building very nice power supplies. I believe only a handful of these mics were made. Howard passed away a few years ago.

After taking a look inside one of these microphones, I figured the circuit was simple enough for me to build on my own but I couldn’t see everything going on and don’t know enough about electronics to fill in the gaps. A few years later, I came across an article written by David Royer which described a microphone he designed and sold a DIY kit for many years ago. This microphone eventually became the Mojave MA200 which Mojave was founded on. Royer’s microphone is essentially a modified U47 circuit with a 67 style capsule.

As I later learned, Howard took the original Royer kit and modified it to improve it. My goal was to clone (get close to? improve?) Howard’s mic which was a slightly modified version of the MA200 which is the modified U47 circuit. A clone of a clone of a clone.

My “design” work didn’t involve modifying the circuit in any way other than changing some transformer and capacitor values. I was mainly “voicing” the microphone. Considering that I don’t have access to a Howard mic in Canada, I bought an MA200 to be able to compare to and make sure that my microphone was a step ahead of it.

There were 4 elements that I voiced - the capsule, microphone transformer, tube, and capacitors. It was done in the order mention so that the elements that make the bigger differences were established first and I then focused on smaller and smaller details.

Starting with the capsule, I had 4 choices ranging from about $50 to $300. The cheaper Chinese ones had a less extended top end and more closed sound. The higher end ones brought a more open sound which more closely matched the MA200.

For the microphone transformer I once again got 4 different transformers to test, 2 of which were custom made. Some had a very transient and aggressive sound while others had a darker and more liquid sound. I chose to go with the later.

With the tubes, there are only so many 5840 tubes that I can repeatedly buy so I ended up with only 2 choices. both of which were NOS parts. The differences here were starting to get very subtle but one tube offered a more open sound.

The last element which I focused on testing and which involved the most extensive testing were the capacitors. Royer’s circuit uses only 2 capacitors in the microphone. While this may not seem like much, I had over 150 possible combinations of capacitors to try out. Theoretically changing the values of these capacitors should have essentially no effect on the sound but I found that not to be true. Some of the capacitors I tried out were Solen, RTX, AudioCap, Axon, NOS Russian, Mundorf, and Sonicap. Although the differences they made were subtle, getting the right combination was key to having an excellent sounding microphone. Ultimately I ended up with 3 top choices for one of the capacitors and 5 for the others. This led to 15 combinations which I picked a winner from. I chose a combination which was a little fast and transient as well as open which worked well with the transformer that I chose to use.

The result is an excellent versatile microphone. with some very high end components that have been meticulously voiced. I am offering them for sale for $850 USD (discount on pairs). Compared to the MA200 which sells for $1200 USD, I can say that mine uses much higher end components. Whether or not it sounds better is subjective. I’m also offering a version for $550 as a way to use up the parts that didn’t make it into the final design. These are still parts which are at least on par with what is in the MA200 and gets you a sound that’s still in the ballpark of the MA200. Arguably better.

Getting the design to where it is today took countless hours but I’m happy with the end result and look forward to using these microphones in future sessions.

Diaphragmatic Absorbers

I’ll write about more general studio acoustics and my approach to studio design in later posts. For now I’ll dive a little into diaphragmatic absorbers. I’ll preface this by saying that there are a number of things I can’t share as it’s either proprietary technology I’ve developed on my own or trade secrets that I learned from one of my mentors, Ken Goerres of Haikoustics.

There are a couple of general categories of bass trapping which people refer to and use. The most basic is simple porous absorbers which normally use insulation materials such as OC 703 or Roxul/Rockwood. Porous absorbers are very inefficient at providing low end absorption unless very thick panels are used (2’?). Other approaches are needed for effective bass absorption.

The 2 categories which normally come up are membrane absorbers and Helmholtz resonators. Membrane absorbers use a sealed cabinet which essentially act as a drum at certain frequencies and subsequently absorb energy out of the room. Helmholtz resonators use chambers tuned to certain frequencies. I won’t go into more depth on those as you can find plenty of info online and in books.

The problem with these 2 types of absorbers are that they have a narrow bandwidth and are tricky to construct (equations don’t translate to real-world built panels so trial-and-error is often required). The approach which I use in my studio and other studios I’ve designed is diaphragmatic absorbers. Terminology is a little blurred in the industry so you may see others calling membrane absorbers diaphragmatic or use other names for what I refer to as diaphragmatic absorbers.

A diaphragmatic absorber is nothing more than a sheet of some material which is damped by another material. Unlike a membrane absorber, there is no sealed cabinet. This allows the sheet to vibrate in a wider range of frequencies.

In my testing I’ve found the dampening to be critical. A vibrating sheet on its own has the potential to absorb large amounts of energy and cause impressive changes in the measured frequency response of a room. The issue is that as the sheet vibrates with a long decay time, it re-radiates sound into the room acting similarly to a speaker. This causes issues in the decay time the room. By dampening the sheet, you get less absorption but also correct the timing response of the panel.

It’s important to note that diaphragmatic absorbers work based on the velocity component of sound rather than pressure as membrane absorbers. This has certain implications on where they’re most effective in a room. Flexibility in the thickness allows thicker panels to be used where more absorption is required (increasing the porous absorption component of the panel). Multiple diaphragmatic layers can also be used in thicker panels.

What kinds of materials work as diaphragmatic absorbers? Sheets of wood, plexiglass, metal, rubber, paper, and certain kinds of foam. I’ve done extensive research and development testing out a variety of materials to find what works best. The choice of material determines the frequency range of absorption. In the studios I design, I use different materials to target 20Hz - 80Hz, 70Hz - 150Hz, and 100Hz - 200Hz.

The use of diaphragmatic absorbers is in no way my own revolutionary idea. Companies such as Primacoustics and GIK Acoustics offer diaphragmatic absorbers such as GIK’s range limiter options.

One type of panel which I have no firsthand experience with but am keen to experiment with are VPR absorbers. These consist of an incredibly large and heavy metal plate that is glued onto IsoBond. They seem to offer very low frequency absorption at thicknesses of only 4”. The issues are the cost of the metal plates and difficulty in mounting them onto a wall due to the weight. RPG offers this technology in their Modex panels which cost a meager $800 per panel.

Do Digital Cables Matter?

Over the last few weeks this has come up a number of times in discussions with a couple of mastering engineers. Yes, they do matter. Do I know why? In some cases, yes. In other cases, no but I have some theories. All I know is that they do have audible effects (although not always but I’ll get to that later).

The first aspect which most people discuss is jitter. If a cable rounds off the edges of the signal in a digital cable during transmission, this can lead to increased jitter. The device on the receiving end may “trigger” a change of state at incorrect times because of the sloping on the square wave. Some devices are more influenced by this than others. Such devices are the ones which are also greatly affected by differences in clocking. A system which is not prone to jitter will not care about this rounding off of edges caused by the cable. One solution to this is to run a separate wordclock cable. The wordclock cable will affect the jitter but the other cable will be used purely as data transmission so the quality of the cable should be irrelevant. In practice, I’ve found this to not be the case and I can only theorize as to why.

My only explanation to cables which are purely for data transmission and not clocking (this includes USB cables) causing a difference has to do with noise. I believe that the electrical connection between devices can result in noise being introduced into the receiving device. Not only can this affect jitter, but it can affect any other circuitry. Paul McGowan of PS Audio once mentioned a story about their DACs sounding different when playing WAV vs FLAC files. The data was identical. They eventually found the difference to be caused by the processor in the unit using more power for decoding FLAC files which put a strain on the power supply and made other parts of the circuity behave differently. It’s not that far of a leap to think that a digital input can wreak similar havoc in a device. Is more shielding on the cable always better? No. There’s something else going on here as well. Adding to the idea of the electrical connection causing trouble, I think that grounding is also involved in this jumble of electricity.

One easy fix to this problem is to use optical cables which galvanically isolate the circuits. Unfortunately, optical cables have increased jitter so it brings us back to square one. When clocking devices with wordclock, then optical provides the perfect solution truly making the quality of the data transmission cables irrelevant. Of course then you need to worry about the quality of your wordclock cables.

What do I think is the ideal setup with digital connections? Using optical cable on a system that uses reclocking or is largely immune to jitter. The DEQX is such a device. It conveniently has all digital input formats so I’ve been able to try them all and determined this to be ideal. Upgrading to glass cables rather than plastic did offer a small improvement so it’s not completely immune to jitter. If your system is highly influenced by clocking and jitter then I recommend trying out as many formats as you can to see what works best.

It’s worth pointing out that there are some cases where the quality of the cables are irrelevant. Jitter and noise only matter in systems that involve a conversion to analog. That means any sort of recording or monitoring. In a purely digital system, then it doesn’t matter. If you have a piece of outboard with digital I/O and all you’re doing is printing something through it, then it won’t matter. The data recorded will always be identical as it’s merely a data transfer. If, however, you’re monitoring while recording through that, the quality of the cables will affect how things sound and very likely the “live” version heard while printing through it will sound different from playing back the recorded file afterwards due to differences in jitter and everything else mentioned.

Based on what I’ve said, it’s easy to see where clocking matters and doesn’t as well as why clocking matters. I won’t go in depth here but in most cases it can make large differences depending on the gear and 10MHz clocking is not the way to go. If you’re in the market for a clock, I’d recommend the Black Lion unit and the ones from Grimm Audio. For an excellent article on all things relating to clocking, check out “The Future of Clocks” on Pink Noise Magazine. A must read for all engineers in the digital era.

Shameless plug - For optical cables I’ve been using Lifatec which aren’t too expensive but are glass. For all other digital cables, I haven’t found anything that sounds better than the cables I make. If you’re interested in trying some out, get in touch with me.

Speaker DSP

Speaker DSP and room correction is a hotly debated topic. When not done properly it can certainly do more harm than good but I believe that when done correctly it will always be better than not having it in the system. In order to achieve the highest quality systems, DSP should be used in a properly treated room. Having said that, fully implementing a DSPed system is a significant expense compared to a traditional system.

In my system I use DEQX units to handle this. There are a couple of other options on the market but none which are as extensive or with a fully integrated setup process. Some alternatives include the Acourate programs, some of the miniDSP devices, and Trinnov which provides more limited capabilities. Despite which system you use, implementing it correctly is critical and should be done by an expert. Recently I’ve been handling system calibrations on my own but only after having seen the process done by Larry Owens and Ken Goerres a number of times.

The DSP in my system targets 4 different areas. The first is the room correction in the lower end of the spectrum. Most people will be familiar with this type of correction. Because of minimum phase behavior below the Schroeder transition area, a simple EQ can correct this region. Of course an analog EQ would cause various degradations to the system so ideally it should be done with DSP before any stage of conversion. One issue which people normally run into is trying to overcorrect their low end which results in more harm than good. This form of room correction must be used in combination with acoustic treatment. Peaks can be brought down by a considerable amount but dips should not be brought up by any large amount using DSP due to the fact that any additional energy at those frequencies will cancel itself out. Even rooms with large amounts of acoustic treatment will have variations in the low end. The main purpose of the acoustic treatment is to bring up the dips as well as to control the decay time. Once this has been achieved, the DSP handles the last bit of flattening the response curve.

The next area which the DSP in my system treats is the higher frequency correction of my speakers. This is largely a correction of the driver response on its own but factors some room anomalies in as well. Many correction systems try to correct the entire response (speaker + room) which results in many issues as a simple response curve does not accurately represent everything that occurs over several hundred milliseconds. The room treatment should be responsible for what happens to the sound beyond the direct sound from the speakers and most attempts to correct this digitally result in strange behavior. Having good off-axis behavior in a speaker is critical for this reason.

Correcting the response of the drivers in the speaker on their own affords many benefits which most speakers on the market do not have. Most speaker designers must aim to create a system that is relatively flat based on the response curves of the drivers they use. This limits their choices quite a bit and they must often sacrifice other aspects of the speaker’s performance. By using DSP correction, the response curve of each driver is fairly trivial which allows the drivers to be selected based on other characteristics. This includes distortion specs, dispersion characteristics. and any other anomalies. By prioritizing these aspects over a naturally flat response curve, an incredibly detailed speaker with extremely low distortion can be created. Control over the dispersion characteristics also creates many new possibilities such as the crossfire horns in my speakers which result in a sweetspot that’s wider than anything else around. More on that in another post.

This type of correction requires filtering beyond what typical IIR filters provide. The DEQX uses a combination of FIR and IIR filters to accomplish this. This allows for the phase and timing domain to be controlled separately from the frequency domain to correct timing anomalies in each driver.

The next aspect which the DEQX controls in my system are the crossovers. By using DSP crossovers, there is no filtering that happens after the conversion stage. Neither active nor passive crossovers. This eliminates the distortions caused by those circuits. Very few designers can create excellent passive crossovers and even then, they cause amplifiers to behave oddly. In most cases active crossovers will perform better than passive but also introduce distortions of their own. Both active and passive crossovers have severe limitations on the filter shapes which they can produce. On top of this, most designers will apply basic filter shapes without taking into account the response curves of the speaker drivers.

By using FIR filters, the DEQX is able to create perfect linear phase crossovers ranging from 48dB/octave to 300dB/octave. This results in no phase distortion which is not possible in other crossovers. The benefit of using steep crossovers (which also isn’t possible in other systems) is that there is little overlap between speaker drivers so the imaging is incredibly precise. The resulting crossovers are completely invisible.

The last area which DSP contributes to my system is in defining the low end of my speakers. Without DSP, my speakers would have a very strange frequency response which is by design. The tuning frequency is below where the drivers naturally roll off. By using DSP, the drivers are extended lower where they meet the tuning frequency of the cabinet. This wizardry adds roughly 10Hz getting the speakers down to 20Hz.

One last point to note is that any ported system should use a high pass filter below the tuning frequency. Without it, those frequencies will cause severe distortion without producing any output from the speakers. By adding a high pass filter, you’ll end up with a cleaner and tighter low end response which appears to extend lower. This is not possible with passive filters so must be done at least with an active filter but ideally with DSP.

The only real drawback to DSP when done correctly is the added expense and system complication. In my particular case, my left and right speakers alone require 6 channels of DACs and amps. The DSP does add latency, around 24ms in my case, so it’s not usable for most tracking but it’s not an issue for mixing and mastering where some plugins add several times that amount of latency.

If you have any questions, want to implement some DSP in your system, or still think that no DSP is better, get in touch.